Are you tired of the same old lunch routine? Are you looking for something tasty, nutritious, and easy to prepare? Look no further! These Chickpea Salad Sandwiches are the perfect solution to your midday meal monotony. Packed with flavor and loaded with wholesome ingredients, they’re sure to become a staple in your lunchtime repertoire.
Nutritional Spotlight: The Mighty Chickpea
Before we dive into the recipe, let’s take a moment to appreciate the star ingredient: chickpeas. These humble legumes are nutritional powerhouses, offering a wealth of health benefits with every bite.
Chickpeas are an excellent source of plant-based protein, making them an ideal option for vegetarians and vegans looking to meet their protein needs. Just one cup of cooked chickpeas provides approximately 15 grams of protein, along with plenty of fiber to keep you feeling full and satisfied.
In addition to their protein and fiber content, chickpeas are rich in essential vitamins and minerals, including folate, iron, phosphorus, and manganese. They’re also low in fat and cholesterol-free, making them a heart-healthy choice for anyone looking to improve their diet.
But perhaps best of all, chickpeas are incredibly versatile. From salads and soups to dips and spreads, there’s no shortage of delicious ways to incorporate these nutritious legumes into your meals.
Now that we’ve sung the praises of chickpeas, let’s get back to the main event: Chickpea Salad Sandwiches!
Prepare Ingredients: Start by rinsing and draining the chickpeas. Then, dice the celery and shallots as instructed.
Food Processor: Using a food processor, chop the chickpeas until they are roughly halved. This will give your salad a delightful texture without being too mushy.
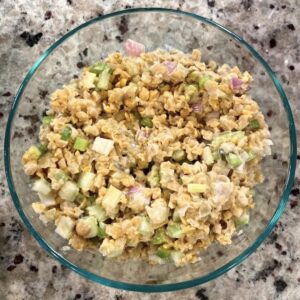
Mix: In a large bowl, combine the chopped chickpeas, diced celery, shallots, vegan mayo, sweet relish, and lemon juice. Mix well until all ingredients are evenly distributed and coated in the creamy dressing.
Ready to Serve: Your Chickpea Salad is now ready to be enjoyed! Spoon it onto your favorite gluten-free bread or wrap, and top with any optional condiments you desire, such as sliced tomato, lettuce, or pickles.
Notes
For an extra burst of sweetness and flavor, consider adding a handful of craisins to your Chickpea Salad. They’ll add a delightful contrast to the savory ingredients and take your sandwich to the next level!
Keyword Chickpeas
With its robust flavor, satisfying texture, and nutritional benefits, Chickpea Salad is a lunchtime game-changer. Whether you’re enjoying it between two slices of bread or wrapped up in a tortilla, this versatile dish is sure to delight your taste buds and nourish your body. So why settle for a boring lunch when you can indulge in the deliciousness of Chickpea Salad Sandwiches? Give this recipe a try and elevate your midday mealtime experience!
Welcome back to the second installment of my Thrive Vegan and Gluten-Free Grocery Haul! As we step into March 2024, I’m thrilled to share the latest additions to my pantry and fridge. Whether you’re a seasoned plant-based enthusiast or simply curious about incorporating more vegan and gluten-free options into your diet, this haul has something for everyone.
Why Thrive?
Before we dive into the goodies, let’s talk about why I love shopping at Thrive Market. They offer a wide selection of high-quality, organic products at affordable prices, all while aligning with my values of sustainability and conscious consumerism. Plus, the convenience of having everything delivered straight to my door is a game-changer, especially with my busy schedule.
Thrive Vegan & Gluten-Free Products
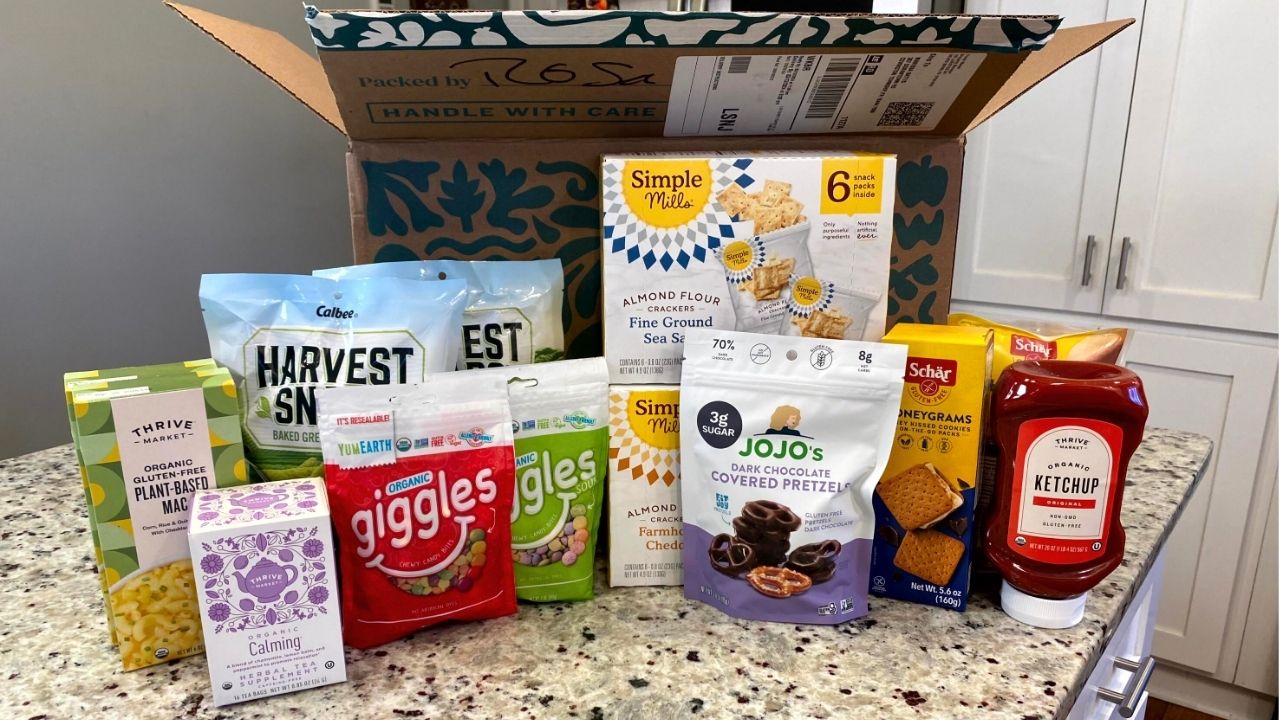
Let’s take a look at some of the fantastic finds from this month’s haul:
Simple Mills Fine Ground Sea Salt Almond Flour Crackers Snack Pack: Perfect for on-the-go snacking, these crackers are crispy and delicious, made with wholesome ingredients.
Harvest Snaps Green Pea Snack Crisps Lightly Salted: A crunchy and satisfying snack that’s packed with protein and fiber.
Schar Gluten-Free Hot Dog Rolls: Finally, gluten-free hot dog buns that actually taste good! These rolls are soft, fluffy, and perfect for your next cookout.
Thrive Organic Gluten-Free Mac & Plant-Based Cheese: Creamy, cheesy, and completely dairy-free! This mac and cheese will satisfy all your comfort food cravings.
Yum Earth Organic Giggles Candy Bites: Treat yourself to these fruity and chewy candy bites, made with organic ingredients and without any artificial colors or flavors.
Thrive Market Organic Ketchup: A pantry staple that’s free from high-fructose corn syrup and artificial ingredients. Perfect for dipping, spreading, or topping your favorite dishes.
Thrive Organic Chamomile Lavender Calming Tea: Wind down with a soothing cup of this herbal tea blend, designed to promote relaxation and stress relief.
Dog Treats
Don’t forget about your furry friends! Here are some treats to spoil them with:
Shameless Pets Soft-Baked Biscuit Dog Treats, Blueberried Treasure: Made with upcycled ingredients, these treats are not only delicious but also environmentally friendly.
Premium Dog Treats, Turkey & Sweet Potato: Your pup will love the savory flavors of turkey and sweet potato in these wholesome treats.
Bone Broth Pour Overs Variety Pack: Add a boost of flavor and nutrition to your dog’s meals with these convenient bone broth pour overs.
That wraps up this month’s Thrive Vegan and Gluten-Free Grocery Haul! I hope you found some new favorites to add to your shopping list. Stay tuned for next month’s haul, where we’ll explore even more delicious and nutritious finds. Until then, happy cooking and snacking!
If you’re in the mood for a comforting meal that’s both vegan and gluten-free, look no further than these Unstuffed Peppers. Packed with flavor and wholesome ingredients, this recipe is sure to become a favorite in your household. Plus, it’s made even easier with the help of an Instant Pot!
Instant Pot:When it comes to meal preparation methods, although I have a personal preference for using the Instant Pot, all recipes shared are suitable for stove-top cooking as well. When I opt for stove-top preparation, I typically utilize a 6.4 cups Dutch oven for soups. Both methods will have printable recipes available below to cater to different preferences.
Pyrex bundle: Before starting the cooking process, it’s recommended to gather and portion out all necessary ingredients, ideally completing some preparatory steps the night before to streamline the process. Using Pyrex containers not only makes storage easier but also doubles as a way to measure ingredients, reducing the need for repeated use of measuring cups. Furthermore, making sure the dishwasher is empty before starting helps speed up the cleanup after cooking.
Vegetable broth: In an effort to optimize cost-effectiveness, I have found purchasing vegetable broth cubes in bulk from online retailers such as Amazon to be a prudent alternative to carton-packaged broth. These cubes can be easily dissolved using an electric kettle and measuring cup set, providing a convenient solution for meal preparation. This equals $0.20 a cup.
16 oz. pint containers: For meal portioning, I suggest using 16 oz plastic pint containers, which provide an appropriate serving size without encouraging overconsumption. These containers, conveniently sold in packs of 50 on Amazon, are dishwasher-safe and freezer-compatible, providing versatile storage options.
These are Amazon Affiliate links that incur no additional cost when clicked.
With its hearty flavors and simple preparation, these Vegan Gluten-Free Unstuffed Peppers are sure to become a staple in your recipe rotation. Whether you’re cooking for yourself or sharing with loved ones, this dish is bound to satisfy.
Peppers
In addition to the tantalizing recipe itself, let’s delve deeper into the culinary wonders behind our Vegan Gluten-Free Unstuffed Peppers. Peppers, often praised for their vibrant colors and crisp textures, are the shining stars of this dish. From the classic green bell peppers to the sweeter varieties like red, orange, and yellow, each adds its own unique flavor profile and visual appeal to the mix. Whether you opt for a single color or a medley of hues, the result is a visually stunning dish that’s as pleasing to the eyes as it is to the palate.
Rice
But let’s not overlook the importance of the rice component in this recipe. While rice might seem like a humble ingredient, its role in the dish is anything but ordinary. By choosing the right type of rice, you can elevate the overall texture and flavor of your Unstuffed Peppers to new heights. White rice offers a light and fluffy consistency, while brown rice brings a nutty depth of flavor and added nutritional benefits. For those looking to experiment further, consider exploring exotic rice varieties such as jasmine, basmati, or even wild rice blends, each imparting its own unique character to the dish.
Impossible Meat
Now, let’s talk about the plant-based protein powerhouse that is Impossible meat. Made from simple, wholesome ingredients and packed with protein, this meat alternative adds a hearty and satisfying element to our Unstuffed Peppers. Not only does it mimic the texture and taste of traditional ground meat, but it also provides a cruelty-free and environmentally sustainable option for those looking to reduce their meat consumption. With Impossible meat, you can enjoy all the savory goodness of meat without compromising on taste or ethics.
Here are two ways to make the stew, either using the Instant Pot or on the stove top.
Vegan Gluten Free Unstuffed Peppers: Instant Pot
If you're in the mood for a comforting meal that's both vegan and gluten-free, look no further than these Unstuffed Peppers.
Prepare Ingredients: Begin by soaking, rinsing, and draining the rice. Then, dice the peppers and onion as instructed.
Saute Vegetables: Switch on the Saute mode on your Instant Pot. Add ½ cup of vegetable broth and cook the diced onions for a few minutes until softened. Next, add the minced garlic and diced peppers, allowing them to cook for an additional two minutes.
Seasoning: Stir in the vegan Worcestershire sauce and black pepper. Once combined, turn off the Saute mode.
Add Ingredients to Instant Pot: Pour in the remaining 2 ½ cups of vegetable broth, along with the tomato sauce, crushed tomatoes, and parboiled rice. Give everything a good stir to ensure all ingredients are well incorporated.
Pressure Cook: Lock the lid of the Instant Pot in place and set the timer to 5 minutes on high pressure.
Prepare Impossible Meat: Meanwhile, on the stove, heat a pan over medium-high heat. Add ¼ cup of water and the Impossible meat, breaking it up into grounds. Cook until browned, then transfer to a bowl and set aside.
Natural Release: Once the Instant Pot timer beeps, allow for a 5-minute natural release before manually releasing any remaining pressure.
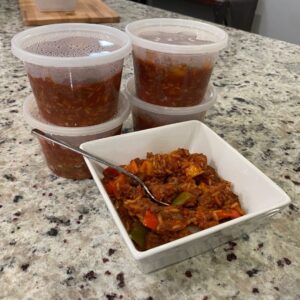
Combine Ingredients: After releasing the pressure, stir in the cooked Impossible meat until evenly distributed. Let the mixture cool for 5 minutes before serving.
Serve or Store: Enjoy your Unstuffed Peppers immediately, or portion them out into containers for convenient meals throughout the week.
Keyword Impossible Meat, Peppers, Rice
Vegan Gluten Free Unstuffed Peppers: Stove Top
With its hearty flavors and simple preparation, these Vegan Gluten Free Unstuffed Peppers are sure to become a staple in your recipe rotation.
Prepare Ingredients: Start by soaking, rinsing, and draining the rice. Dice the peppers and onion as directed.
Saute Vegetables: In a large pot or Dutch oven, heat a tablespoon of 1/2 cup vegetable broth over medium heat. Add the diced onions and cook until softened, about 3-4 minutes. Stir in the minced garlic and diced peppers, cooking for an additional 2 minutes.
Seasoning: Add the vegan gluten free Worcestershire sauce and black pepper to the pot, stirring to combine.
Add Ingredients to Pot: Pour in the vegetable broth, tomato sauce, crushed tomatoes, and parboiled rice. Stir well to combine all ingredients evenly.
Simmer: Bring the mixture to a gentle boil, then reduce the heat to low. Cover the pot and let it simmer for about 20-25 minutes, or until the rice is cooked through and the peppers are tender. Stir occasionally to prevent sticking.
Prepare Impossible Meat: While the pepper mixture is simmering, heat a separate skillet over medium-high heat. Add a ¼ cup water and the Impossible meat, breaking it up with a spatula. Cook until browned, then remove from heat and set aside
Combine Ingredients: Once the rice and peppers are fully cooked, stir in the cooked Impossible meat until well incorporated.
Serve: Garnish with your favorite toppings, such as fresh herbs or a sprinkle of vegan cheese, if desired. Serve hot and enjoy your delicious Vegan Gluten-Free Unstuffed Peppers!
Keyword Impossible Meat, Peppers, Rice
With its hearty flavors and simple preparation, these Vegan Gluten Free Unstuffed Peppers are sure to become a staple in your recipe rotation. Whether you’re cooking for yourself or sharing with loved ones, this dish is bound to satisfy you.
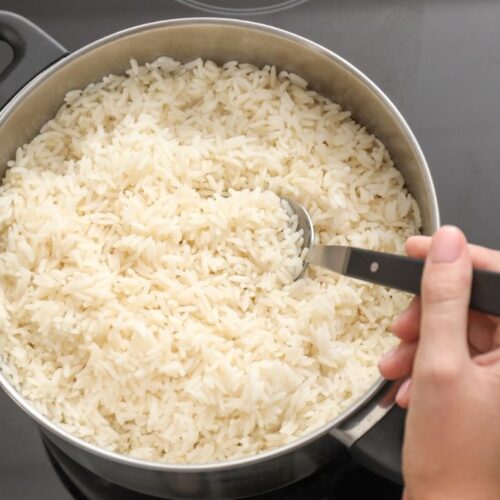
In my YouTube video I will show how to cook jasmine rice to perfection! Whether you’re a seasoned chef or a beginner in the kitchen, mastering the art of cooking rice is a valuable skill. In this blog post, we’ll walk you through the a quick step-by-step process of cooking jasmine rice on the stove. Get ready to impress your taste buds and elevate your culinary repertoire!
Benefits of Jasmine Rice
Jasmine rice isn’t just delicious—it’s also packed with health benefits. This fragrant rice variety is naturally gluten-free, making it a great option for those with gluten sensitivities or celiac disease. Additionally, jasmine rice is low in fat and cholesterol, making it a heart-healthy choice. It’s also a good source of complex carbohydrates, providing a steady release of energy to keep you feeling satisfied and energized throughout the day.
Versatility in Cooking
One of the best things about jasmine rice is its versatility in cooking. While this blog post focuses on cooking jasmine rice on the stove, there are countless other ways to enjoy this aromatic grain. You can use jasmine rice as a base for stir-fries, pilafs, rice bowls, and more. It pairs perfectly with a wide range of flavors and ingredients, making it a staple in cuisines around the world.
Incorporating Jasmine Rice into Your Meal Prep Routine
Jasmine rice is also a fantastic option for meal prep. Cook a big batch of rice at the beginning of the week and use it as a base for quick and easy meals throughout the week. Pair it with roasted vegetables, grilled chicken, tofu, or beans for a balanced and nutritious meal. You can also use leftover jasmine rice to make delicious fried rice or rice pudding for a tasty treat.
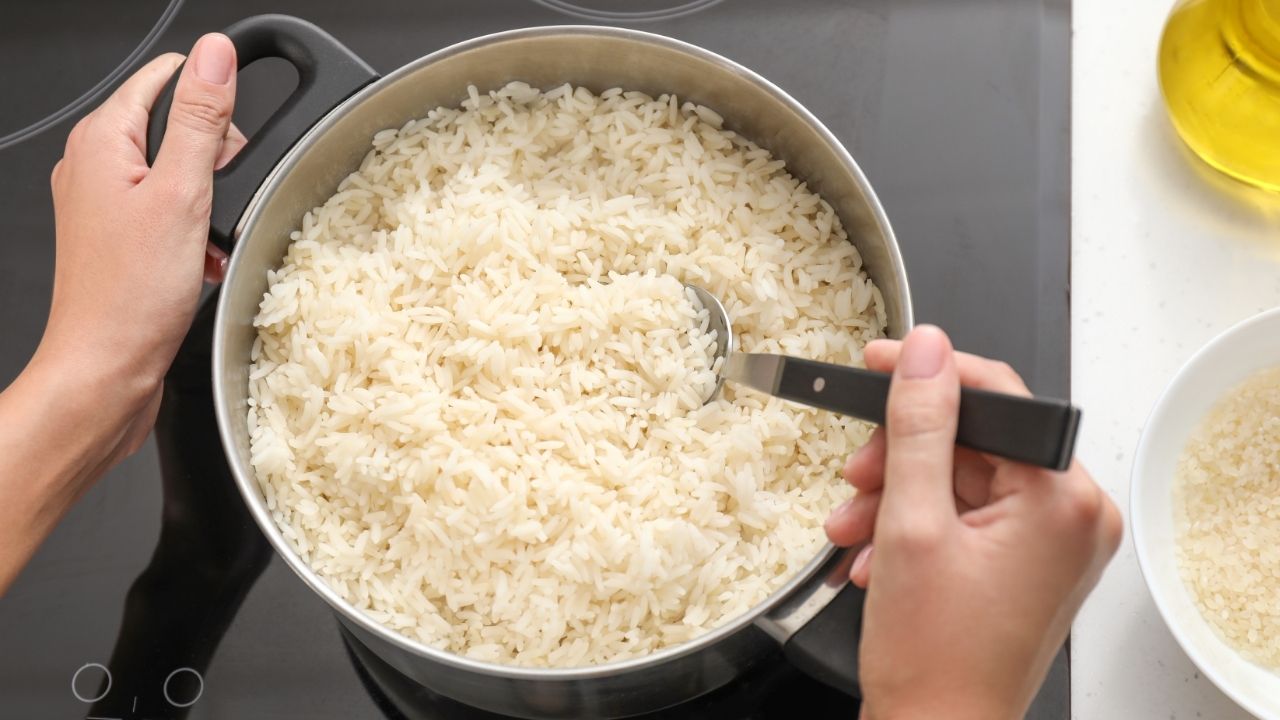
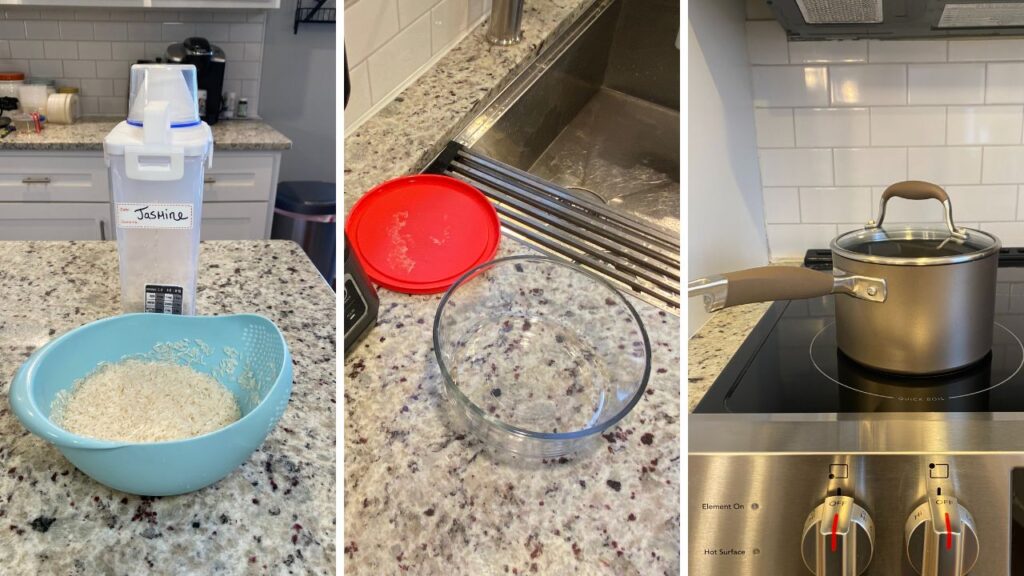
Jasmine Rice on the Stove Top
I will walk you through the step-by-step process of cooking jasmine rice on the stove.
Congratulations! You’ve successfully cooked jasmine rice on the stove. With this simple yet delicious recipe, you’ll be able to enjoy fluffy and fragrant rice every time. Whether you’re serving it alongside your favorite curry or enjoying it as a simple side dish, there’s nothing quite like a bowl of perfectly cooked jasmine rice. Experiment with flavors and enjoy the culinary journey!
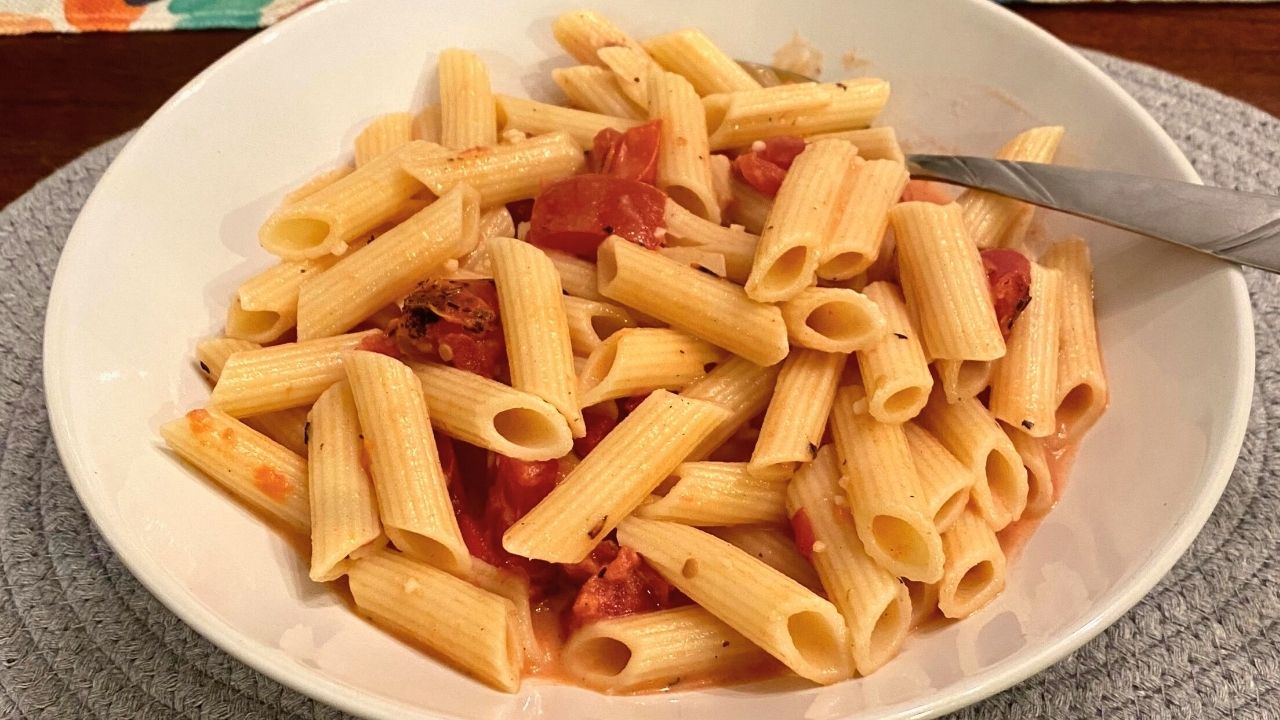
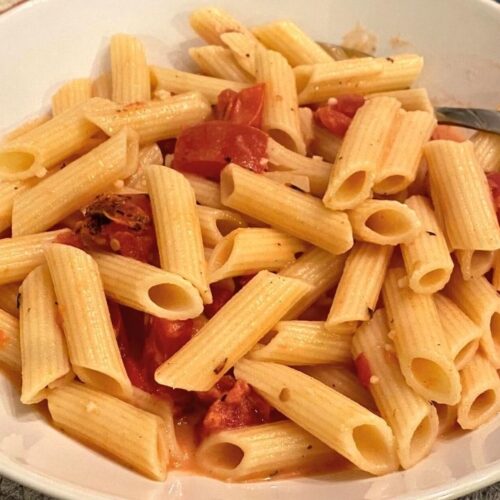
Are you craving a delicious and comforting pasta dish that’s also vegan gluten-free? Look no further! Our Creamy Feta Tomato Penne Rigate recipe is not only easy to make but also bursting with flavor. This delightful dish combines the richness of feta cheese with the tanginess of fire-roasted tomatoes, all enveloping perfectly cooked penne rigate pasta. Plus, it’s a great option for leftovers, as the flavors meld even more deliciously overnight.
Cooking Tips and Tricks
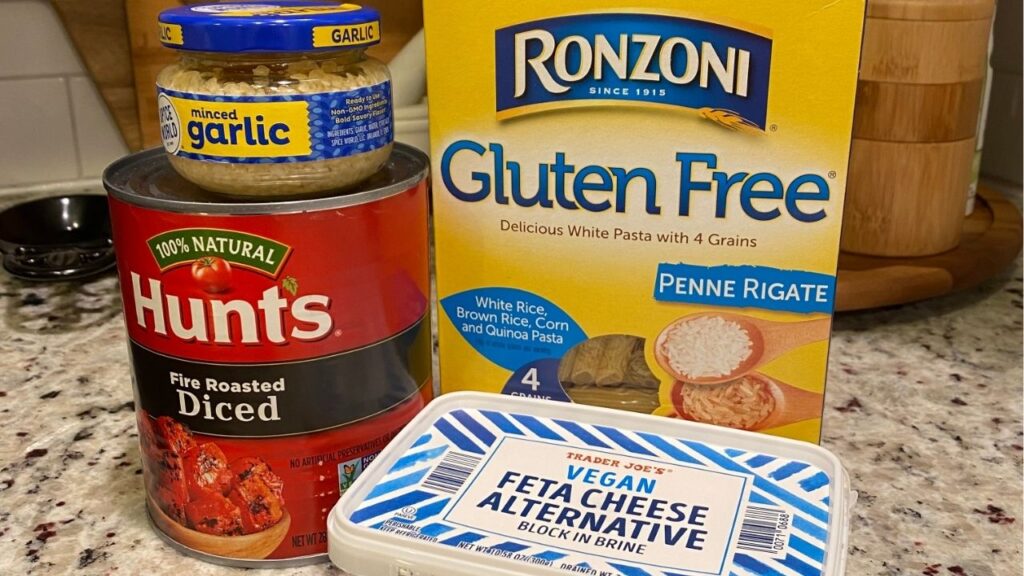
Optimal Pasta Cooking: Ensure perfectly cooked pasta by following the instructions on the Ronzoni Gluten-Free Penne Rigate box. Be mindful not to overcook the pasta, as it can become mushy.
Draining Feta Cheese: Draining the liquid from the Feta cheese over the sink prevents any excess moisture from diluting the sauce, ensuring a rich and creamy consistency.
Adjusting Sauce Thickness: If you prefer a thicker sauce, opt for diced tomatoes without draining them. For a thinner consistency, drain the tomatoes before adding them to the pan.
Enhancing Flavor: Experiment with adding additional ingredients such as fresh herbs like basil or oregano, a dash of red pepper flakes for heat, or a squeeze of lemon juice for brightness to elevate the flavor profile of the dish.
Why This Recipe Works
Gluten-Free Goodness: With Ronzoni Gluten-Free Penne Rigate as the star ingredient, this recipe caters to those with gluten sensitivities or preferences without compromising on taste or texture.
Creamy and Tangy Fusion: The combination of creamy feta cheese and tangy fire-roasted tomatoes creates a harmonious balance of flavors that elevates the dish to a whole new level of deliciousness.
Easy and Quick Preparation: With simple steps and readily available ingredients, this recipe is perfect for busy weeknights when you want a satisfying meal without spending hours in the kitchen.
Versatile and Flavorful: While this recipe calls for penne rigate, feel free to swap it out with your favorite gluten-free pasta shape. Additionally, you can customize the dish by adding your choice of herbs or spices to suit your taste preferences.
Easy Vegan Gluten Free Feta Pasta
This delightful dish combines the richness of feta cheese with the tanginess of fire-roasted tomatoes, all enveloping perfectly cooked penne rigate pasta.
Cook the gluten-free penne rigate pasta according to the instructions on the box. Drain and set aside.
Open the Feta cheese over the sink and carefully drain the liquid.
In a pan, add about ¼ cup of water and heat it over medium-high heat.
After a minute, add 1 tbsp of minced garlic to the pan and sauté for a few minutes until fragrant.
Add the block of Feta cheese and the can of diced tomatoes to the pan. If you prefer a chunkier sauce, drain the tomatoes before adding them.
Let the mixture cook down until the Feta cheese has melted and the sauce is creamy and well combined.
Mix the cooked pasta with the creamy Feta tomato sauce until well coated.
Turn off the heat and let the dish sit for about 5 minutes to allow the flavors to meld together.
Serve hot and enjoy the creamy goodness!
Notes
The leftovers taste even better the next day as the flavors continue to develop. Simply store any remaining pasta in an airtight container in the refrigerator and reheat before serving.
Share Your Experience
We would love to hear about your experience making our Creamy Feta Tomato Penne Rigate! Did you customize the recipe with your own twist? How did it turn out? Share your thoughts, photos, and feedback in the comments below. Your input helps us continue to create and share delicious recipes with our community.
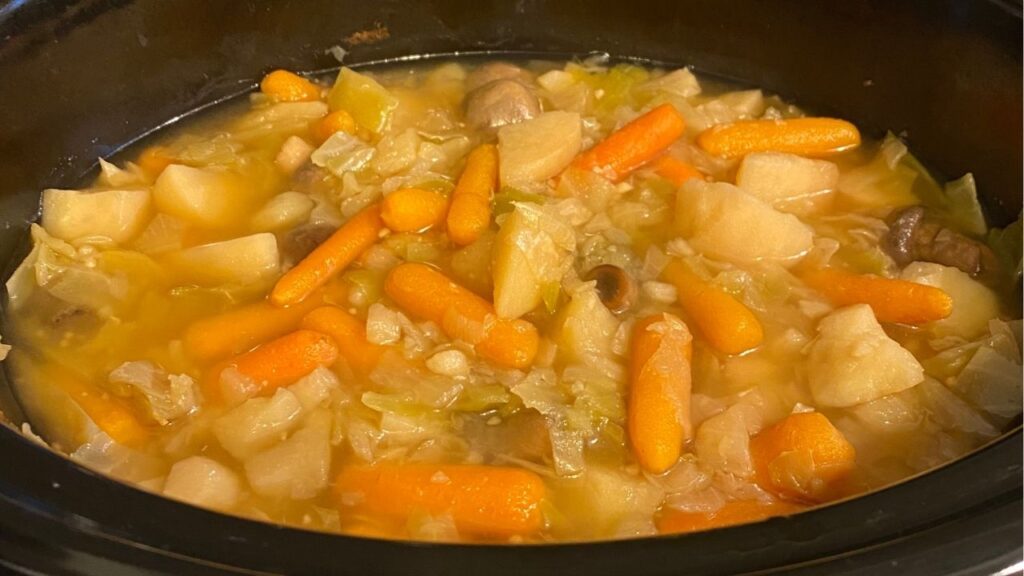
Looking for a hearty yet healthy dish to celebrate St. Patrick’s Day? Look no further! This Vegan Gluten-Free Irish Stew is not only delicious and comforting but also perfect for those with dietary restrictions. Packed with wholesome ingredients, this stew will surely become a favorite in your recipe repertoire.
The Perfect St. Patrick’s Day Delight
St. Patrick’s Day is a time for celebration, parades, and of course, delicious food! While traditional Irish cuisine often includes meat and dairy, there’s no reason why those following a vegan or gluten-free diet should miss out on the festivities. That’s where this Vegan Gluten-Free Irish Stew comes in – it’s a delightful twist on a classic dish, perfect for honoring Irish heritage while accommodating dietary preferences.
A Taste of Ireland, Without Compromise
Irish stew has been a staple of Irish cuisine for centuries, known for its hearty and comforting flavors. Traditionally made with lamb or beef, this vegan version swaps out the meat for wholesome vegetables, resulting in a dish that’s equally satisfying and nourishing. The combination of carrots, potatoes, cabbage, and mushrooms creates a symphony of flavors and textures that will transport you straight to the Emerald Isle with every bite.
Health Benefits Galore
Not only is this Vegan Gluten-Free Irish Stew delicious, but it’s also incredibly nutritious. Packed with vitamins, minerals, and fiber from the fresh vegetables, it’s a wholesome meal that will leave you feeling energized and satisfied. Plus, by using gluten-free broth and skipping the meat and dairy, it’s a dish that’s suitable for a wide range of dietary needs, making it perfect for sharing with friends and family, regardless of their dietary restrictions.
Slow-Cooked Perfection
One of the best things about this stew is how easy it is to prepare. Simply chop up your ingredients, toss them in the slow cooker with some broth, and let the magic happen. As the stew simmers low and slow, the flavors develop and intensify, resulting in a rich and flavorful dish that’s perfect for serving on St. Patrick’s Day – or any day when you’re craving a taste of Ireland.
Vegan Gluten Free Irish Stew
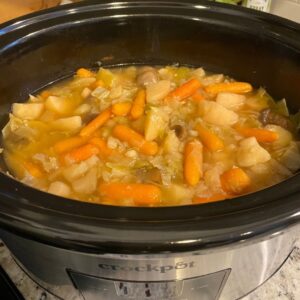
This Vegan Gluten-Free Irish Stew is not only delicious and comforting but also perfect for those with dietary restrictions.
Chop Ingredients: Begin by chopping all the ingredients. Cut the carrots, cabbage, potatoes, and mushrooms into bite-sized pieces.
Combine Ingredients: In a slow cooker, combine the chopped carrots, cabbage, potatoes, mushrooms, and broth.
Slow Cook: Set your slow cooker on low heat and let it simmer for 8 hours. This slow cooking process allows all the flavors to meld together, resulting in a rich and savory stew.
Serve and Enjoy: Once the stew is ready, ladle it into bowls and serve hot. Garnish with fresh herbs if desired, and enjoy the comforting flavors of this Vegan Gluten-Free Irish Stew.
Whether you’re celebrating with friends or enjoying a cozy night in, this Vegan Gluten-Free Irish Stew is sure to delight everyone at the table. So grab your slow cooker and let the festivities begin! Happy St. Patrick’s Day!
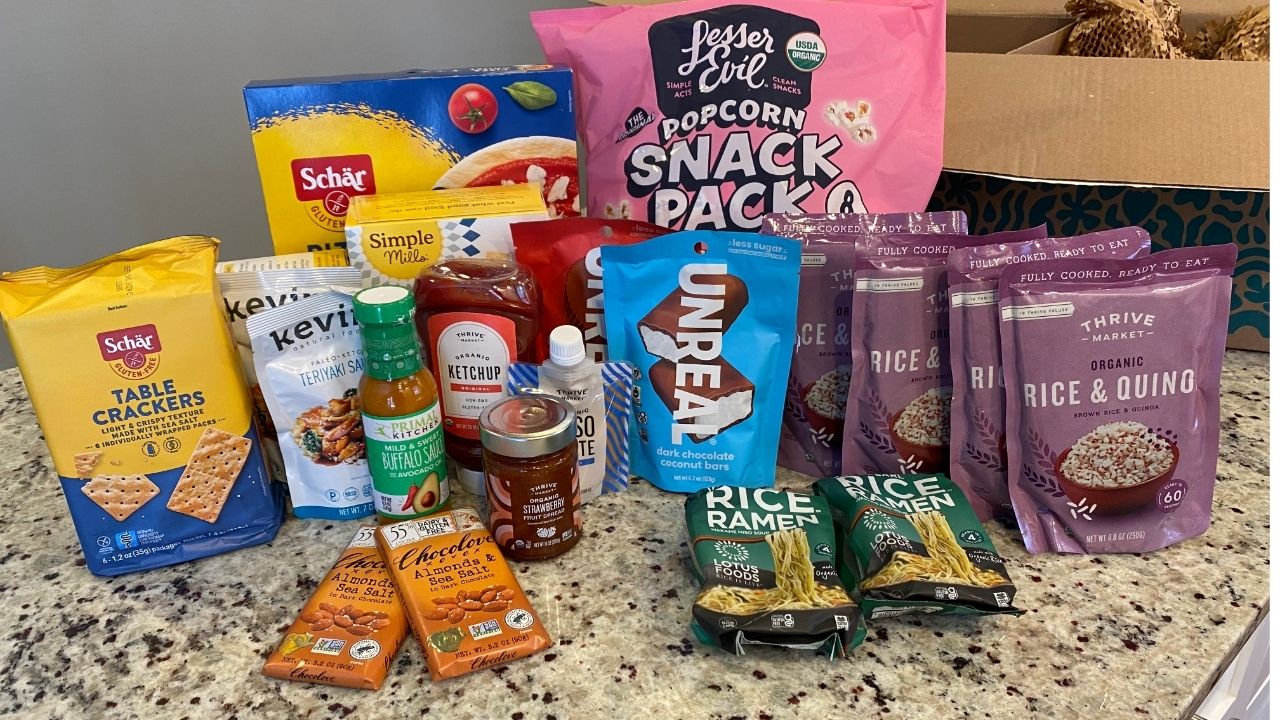
Welcome back to my first exciting installment of my Thrive Vegan and Gluten-Free Grocery Haul! As we dive into February 2024, I’m thrilled to share with you the latest additions to my pantry and fridge. Whether you’re a seasoned plant-based enthusiast or simply curious about incorporating more vegan and gluten-free options into your diet, I’ve got you covered.
Why Thrive?
Before we delve into the goodies, let’s talk about why I love shopping at Thrive Market. Not only do they offer a vast selection of high-quality, organic products at affordable prices, but they also align with my values of sustainability and conscious consumerism. Plus, the convenience of having everything delivered straight to my door is a game-changer, especially with my busy schedule.
February’s Finds
Without further ado, let’s take a closer look at some of the standout products from this month’s haul:
Simple Mills Fine Ground Sea Salt Almond Flour Crackers Snack Pack: These crispy crackers are the perfect snack to satisfy those mid-afternoon cravings. Made with almond flour and a hint of sea salt, they’re both delicious and wholesome.
LesserEvil Organic Popcorn, Himalayan Pink Salt, Snack Pack: Who doesn’t love a good movie night snack? This organic popcorn is air-popped to perfection and seasoned with just the right amount of Himalayan pink salt.
Schar Gluten-Free Pizza Crusts: Pizza night just got a whole lot better with these gluten-free crusts from Schar. They’re crispy on the outside, soft on the inside, and the perfect canvas for your favorite toppings.
Primal Kitchen Buffalo Sauce, Mild & Sweet: Add a kick of flavor to your meals with this delicious buffalo sauce from Primal Kitchen. It’s made with high-quality ingredients and free from added sugars and artificial flavors.
Unreal Dark Chocolate Bars & Peanut Butter Cups: Indulge your sweet tooth with these guilt-free treats from Unreal. Made with fair trade ingredients and no artificial preservatives, they’re sure to satisfy any chocolate craving.
Kevin’s Natural Foods Teriyaki Sauce: Elevate your stir-fries and marinades with this mouthwatering teriyaki sauce from Kevin’s Natural Foods. It’s made with clean, simple ingredients and packs a punch of flavor.
Lotus Foods Organic Jade Pearl Rice Ramen with Miso Soup: Warm up on chilly days with a bowl of comforting ramen made with organic jade pearl rice noodles and savory miso soup.
Thrive Market Organic Brown Rice & Quinoa, 4-pack: Stock up on this nutritious blend of organic brown rice and quinoa, perfect for adding to salads, stir-fries, or enjoying as a side dish.
Thrive Market Organic Ketchup & White Miso Paste: Essentials for any pantry, Thrive Market’s organic ketchup and white miso paste are versatile ingredients that can be used in a variety of dishes.
Thrive Market Organic Strawberry Fruit Spread: Spread some love on your morning toast or add a dollop to your oatmeal with this delicious organic strawberry fruit spread.
Join the Conversation
That wraps up this month’s Thrive Vegan Gluten-Free Grocery Haul! I hope you enjoyed discovering some new products and are inspired to incorporate more plant-based and gluten-free options into your own kitchen. Don’t forget to leave a comment below with any questions or product recommendations—I love hearing from you!
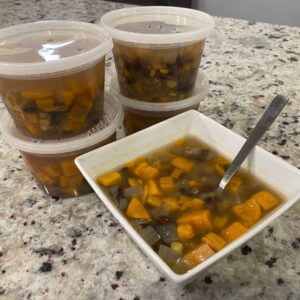
Today, we’re delving into the world of cozy soups with a vibrant twist. Our star dish? Sweet Potato Black Bean Soup, crafted to perfection in the Instant Pot. This recipe promises a delightful fusion of sweet and savory flavors, making it an instant favorite for your weekly meal rotation.
Favorite Meal Prep Equipment & Supplies
Instant Pot: When it comes to meal preparation methods, although I have a personal preference for using the Instant Pot, all recipes shared are suitable for stove-top cooking as well. When I opt for stove-top preparation, I typically utilize a 6.4 cups Dutch oven for soups. Both methods will have printable recipes available below to cater to different preferences.
Pyrex bundle: Before starting the cooking process, it’s recommended to gather and portion out all necessary ingredients, ideally completing some preparatory steps the night before to streamline the process. Using Pyrex containers not only makes storage easier but also doubles as a way to measure ingredients, reducing the need for repeated use of measuring cups. Furthermore, making sure the dishwasher is empty before starting helps speed up the cleanup after cooking.
Vegetable broth: In an effort to optimize cost-effectiveness, I have found purchasing vegetable broth cubes in bulk from online retailers such as Amazon to be a prudent alternative to carton-packaged broth. These cubes can be easily dissolved using an electric kettle and measuring cup set, providing a convenient solution for meal preparation. This equals $0.20 a cup.
16 oz. pint containers: For meal portioning, I suggest using 16 oz plastic pint containers, which provide an appropriate serving size without encouraging overconsumption. These containers, conveniently sold in packs of 50 on Amazon, are dishwasher-safe and freezer-compatible, providing versatile storage options.
This Instant Pot Sweet Potato Black Bean Soup is a testament to the magic of simple, wholesome ingredients coming together to create something truly spectacular. From its velvety texture to its rich flavor profile, every spoonful is a reminder of the joys of homemade cooking. So, fire up your Instant Pot and treat yourself to a bowl of comfort today!
Here are two ways to make the soup, either using the Instant Pot or on the stove top.
Sweet Potato Black Bean Soup: Instant Pot
Today, we're delving into the world of cozy soups with a vibrant twist. Our star dish? Sweet Potato Black Bean Soup, crafted to perfection in the Instant Pot.
4cupspeeled and chopped sweet potatoes3 medium sweet potatoes
2teaspoonsground cumin
1/4teaspoonblack pepper
Instructions
Prep Work: Start by gathering and measuring all your ingredients. This ensures a smooth cooking process.
Sauté Aromatics: Set your Instant Pot to Saute mode. Add diced onions and minced garlic along with ½ cup of vegetable broth. Sauté for about 2 minutes until they turn fragrant and translucent.
Add Corn and Spices: Incorporate the frozen corn (or canned corn) into the pot and cook for an additional 2 minutes. Sprinkle in the ground cumin and black pepper, infusing the dish with warm, aromatic flavors.
Combine Remaining Ingredients: Switch off the Saute mode. Now, add in the remaining ingredients: vegetable broth, black beans, and chopped sweet potatoes.
Pressure Cook: Secure the lid on your Instant Pot. Select the manual mode and set the cooking time to 5 minutes at high pressure. Once the cooking cycle completes, allow a natural pressure release for 10 minutes. Then, carefully release the remaining pressure.
Serve or Store: With the pressure released, open the lid and let the soup cool for about 5 minutes. Now, you have two options: Serve immediately, indulging in the comforting warmth and rich flavors. Or, if you're planning ahead, divide the soup into 5 pint-sized containers for convenient storage throughout the week.
Notes
Whether enjoyed fresh or saved for later, this Sweet Potato Black Bean Soup is sure to delight your taste buds with its wholesome goodness. This soup would be great with fresh kale or sweet potato pasta.
Keyword Black Beans, Sweet potato
Sweet Potato Black Bean Soup: Stovetop
Welcome to our dynamic recipe blog! Today, we're bringing you the beloved Sweet Potato Black Bean Soup, but with a twist—it's all about the stovetop cooking method!
4cups sweet potatoes,peeled and chopped 3 medium sweet potatoes
2teaspoonsground cumin
1/4teaspoonblack pepper
Instructions
Prep Work: Begin by preparing all your ingredients. Chop the sweet potatoes, dice the onion, mince the garlic, and measure out the spices.
Sauté Aromatics: Heat a large pot over medium heat. Add a splash of vegetable broth, then add the diced onions and minced garlic. Sauté for about 2 minutes until they become fragrant and translucent.
Add Corn and Spices: Stir in the frozen corn (or canned corn) and cook for an additional 2 minutes, allowing the flavors to meld together. Sprinkle in the ground cumin and black pepper, stirring well to evenly distribute the spices.
Incorporate Remaining Ingredients: Now, add the vegetable broth, black beans, and chopped sweet potatoes to the pot. Give everything a good stir to combine.
Simmer: Bring the soup to a gentle boil, then reduce the heat to low. Cover the pot and let the soup simmer for about 20-25 minutes, or until the sweet potatoes are tender.
Serve and Enjoy: Ladle the soup into bowls and garnish with your favorite toppings, such as fresh kale or sweet potato pasta. If you're planning ahead, divide the soup into 5 pint-sized containers for convenient storage throughout the week.
Notes
Whether enjoyed fresh or saved for later, this Sweet Potato Black Bean Soup is sure to delight your taste buds with its wholesome goodness. This soup would be great with fresh kale or sweet potato pasta.
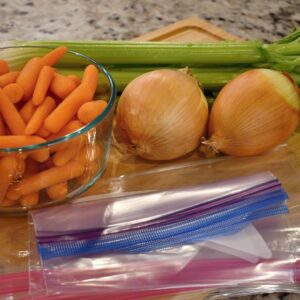
Today, we’re sharing a genius trick for speeding up soup prep: Veggie Freezer Packs. Carrots, onions, and celery form the essential trio of ingredients, a fundamental base found in the majority of soup recipes. Say goodbye to last-minute chopping and hello to two pots’ worth of conveniently prepared ingredients. Let’s dive into the details of creating these handy packs!
Learn how to prepare Veggie Freezer Packs that will revolutionize your meal prep routine. Whether you’re a busy parent or just looking to save time in the kitchen, these packs are a game-changer. Stock up and buy the carrots, onions, and celery when on sale to save money. In this video, we guide you through the step-by-step process of creating these convenient freezer packs. The trifecta of soup ingredients—carrots, onions, and celery—becomes your secret weapon for whipping up delicious soups without the fuss.
✅ No more last-minute chopping!
✅ Save time on busy weekdays!
✅ Enjoy homemade soups with ease!
These Veggie Freezer Packs are not only a time-saver but also a budget-friendly solution to elevate your soup game. Say goodbye to kitchen stress and hello to effortless meals! If you found this video helpful, give it a thumbs up, and don’t forget to subscribe for more kitchen tips and hacks. Share this video with your fellow food enthusiasts who love the idea of making mealtime a breeze. Let us know in the comments if you try this hack or if you have any other time-saving kitchen tricks you’d like to share. Happy cooking!
Prep Soups Fast with Veggie Freezer Packs
Today, we're sharing a genius trick for speeding up soup prep: Veggie Freezer Packs. Carrots, onions, and celery form the essential trio of ingredients, a fundamental base found in the majority of soup recipes.
Prep Your Workspace: Before we start chopping, clear your workspace. Make sure you have a clean cutting board, a sharp knife, and a food processor if you have one.
Chop, Chop, Chop: Begin by cleaning and chopping all your veggies. For a time-efficient solution, use a food processor to finely chop the onions. I like to chop the celery first because it is easier to clean when chopped. I also like to cut the baby carrots in groups of four in four pieces. This allows me to cut the whole bag faster.
Separate the Onions: Onions have a strong flavor, and it's best to keep them separate to maintain their individual taste and typically go in the soup first. Place the finely chopped onions into a pint-size freezer bag. Then put half the carrots and celery in the freezer bags. Lastly, place the pint size bags of onions in gallon freezer bags.
Assemble Your Packs: Seal the bags tightly, ensuring no air is trapped inside. If you have a vacuum sealer, this is the perfect time to put it to use. Label each bag with the contents and the date of preparation.
Freeze for Future Comfort: Pop these Veggie Freezer Packs into the freezer, and you're done! These packs will stay fresh for up to two months, providing you with a hassle-free solution for quick and delicious homemade soups.
Notes
For speedy use, run them under warm water to remove the plastic bag. Then defrost in the pot.
Congratulations! You’ve just created your own kitchen shortcut that will save you time and effort on those busy days. The next time you crave a comforting bowl of soup, simply grab one of these Veggie Freezer Packs, and you’ll be on your way to a hearty meal in no time. Happy cooking!