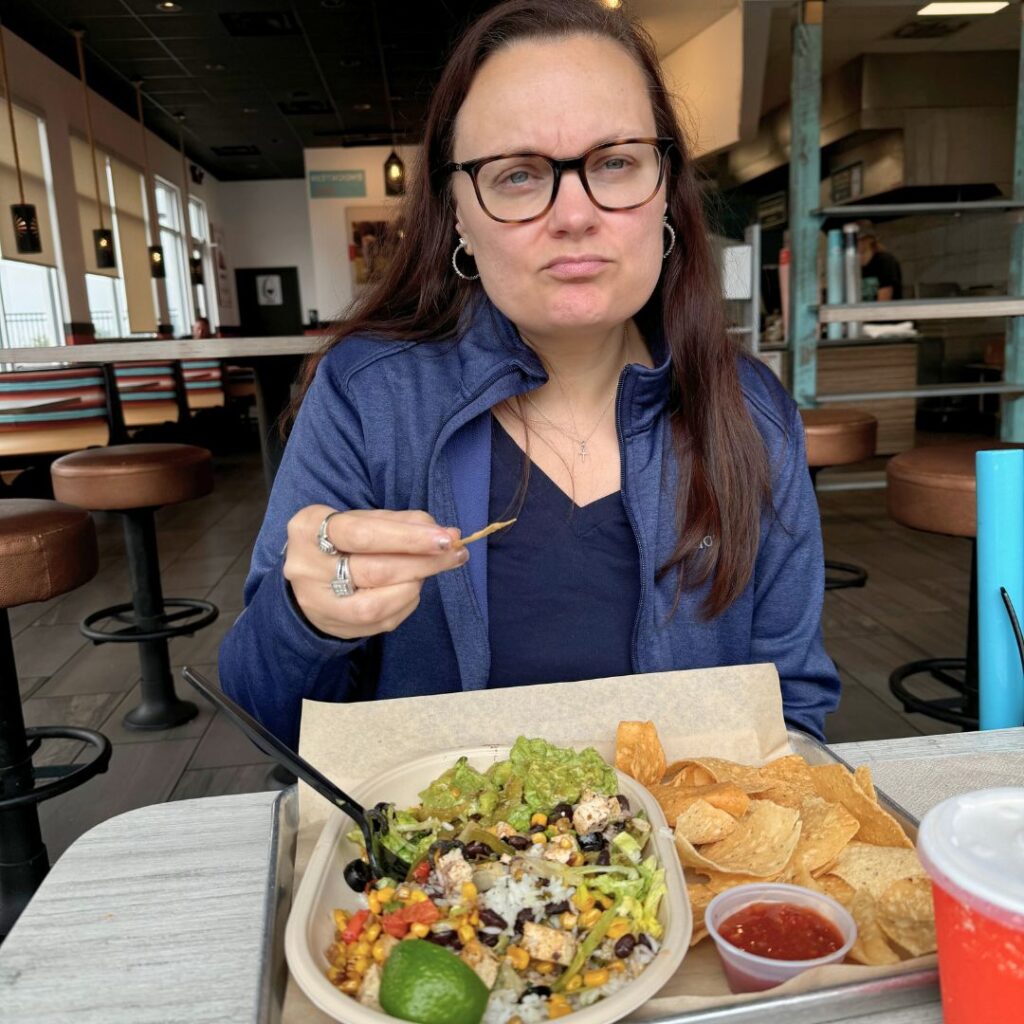
On our road trip to Cleveland, Ohio, we made a quick and satisfying stop in Bloomsburg, Pennsylvania, at Moe’s Southwest Grill. It can be tough to find gluten-free vegan food while traveling, but Moe’s really came through. Watch my short video below to see exactly what I ordered and why I think this is a solid option for road trippers with dietary needs like mine!
Finding Healthy Food on the Road Traveling with dietary restrictions isn’t always easy—especially when you’re trying to stay healthy and fueled for an athletic event. I was on my way to Cleveland to race in a half marathon, and I knew I needed a nutrient-rich meal that wouldn’t upset my stomach. Fast food is often a no-go for those of us avoiding gluten and animal products, so finding a place like Moe’s that offers customizable meals was a huge win. Stay tuned for upcoming blog posts where I share more vegan-friendly stops we discovered during our time in Ohio!
How Moe’s Works – Just Like Chipotle If you’ve ever been to Chipotle, the setup at Moe’s will feel very familiar. It’s a made-to-order assembly line where you choose your base, protein, toppings, and extras. This kind of layout is perfect for people with dietary restrictions because you get to see exactly what’s going into your meal, and you can easily skip any ingredients that don’t work for your needs. I found the staff at this location to be helpful and patient as I asked questions about ingredients and cross-contamination.
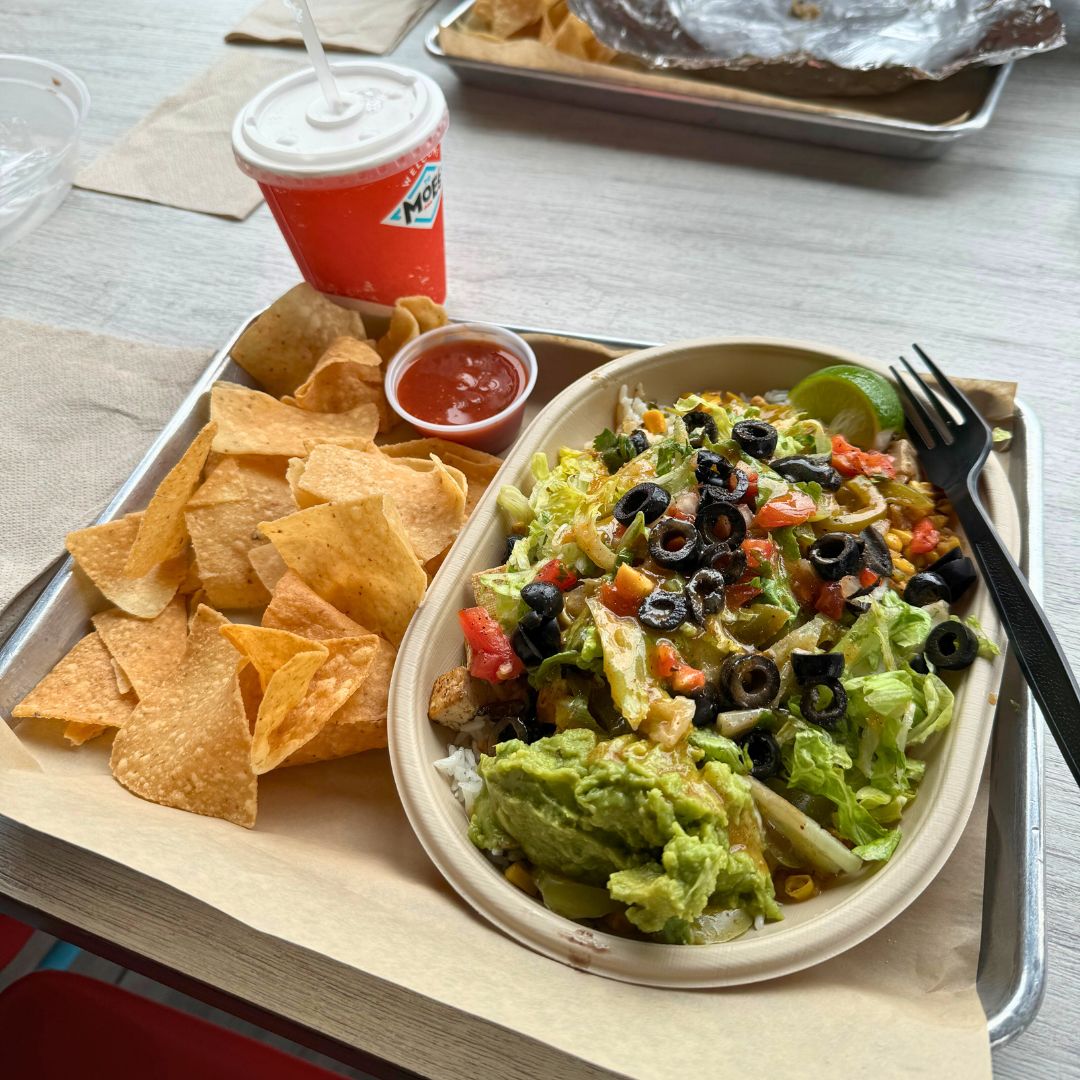
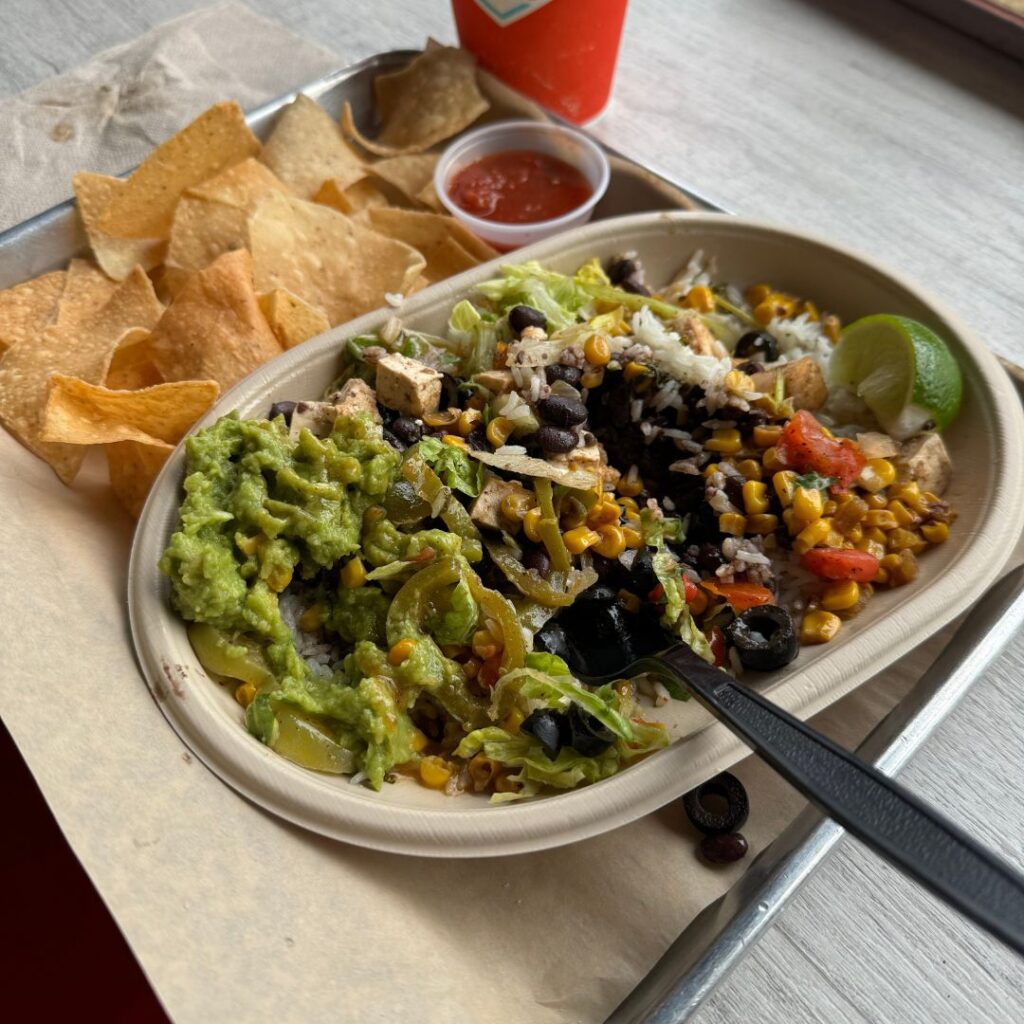
My Vegan and Gluten-Free Bowl at Moe’s I went with the Build Your Own Bowl option and packed it with satisfying and flavorful ingredients. My base was cilantro lime rice, and I added black beans, grilled peppers and onions, and roasted corn salsa. For protein, I chose the tofu, which was seasoned well and had a great texture. I topped it all off with shredded lettuce, black olives, and a generous scoop of guacamole. On the side, I grabbed their classic tortilla chips with salsa—simple and delicious. For a refreshing drink, I opted for an AHA sparkling water in lemon and lime, which came from their sleek, state-of-the-art drink machine.
Final Thoughts – Would You Try Moe’s? Overall, Moe’s in Bloomsburg was a great stop. The restaurant was clean, affordable, and quick, and I left feeling full without any stomach issues—a big deal when you’re eating on the go. I love that Moe’s makes it easy to build a meal that fits a gluten-free vegan lifestyle. Have you tried Moe’s? What do you usually order there? Leave a comment below—I’d love to hear your thoughts and any recommendations for other road trip-friendly vegan spots!
How to Make a Hearty Vegan Burrito Filling Mixture
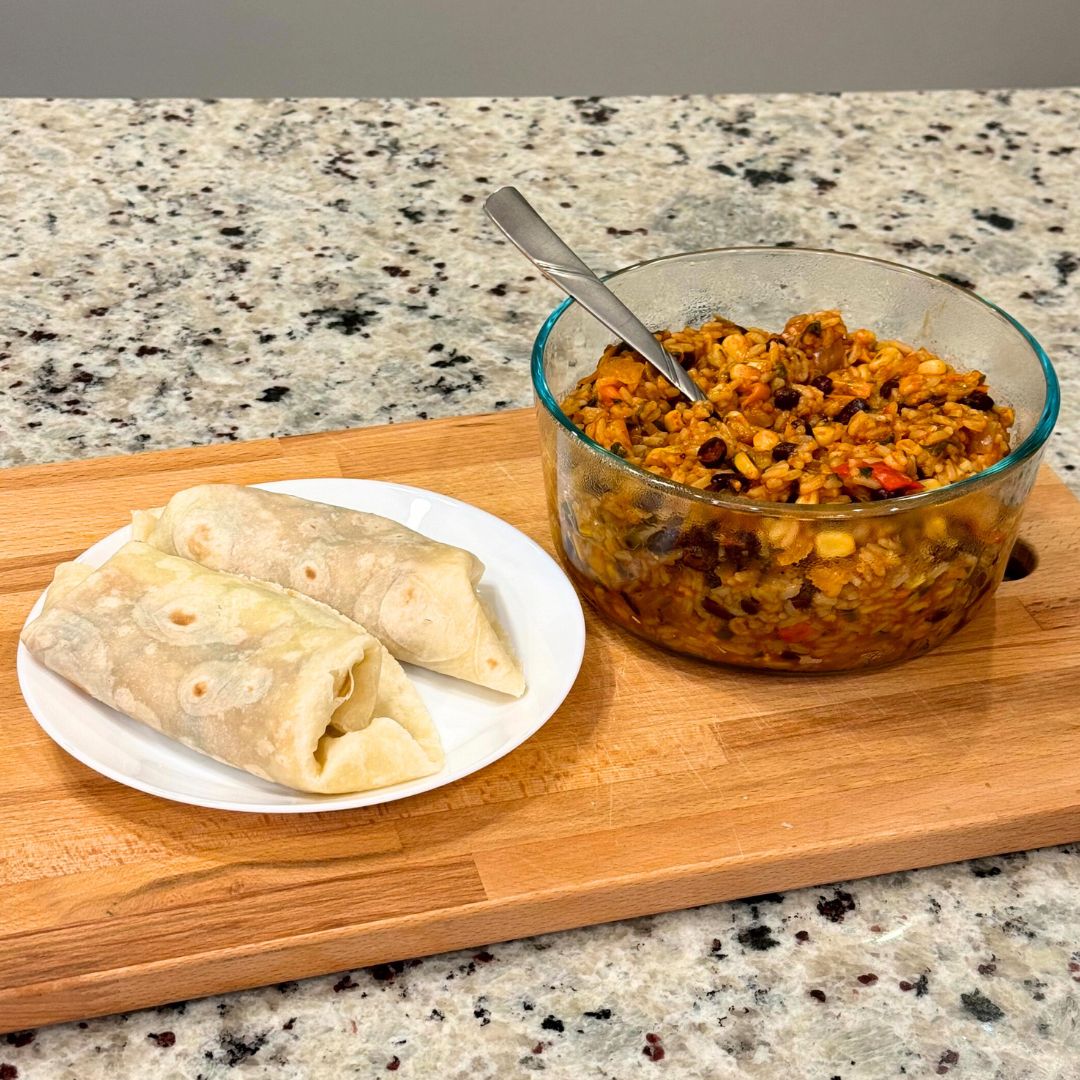
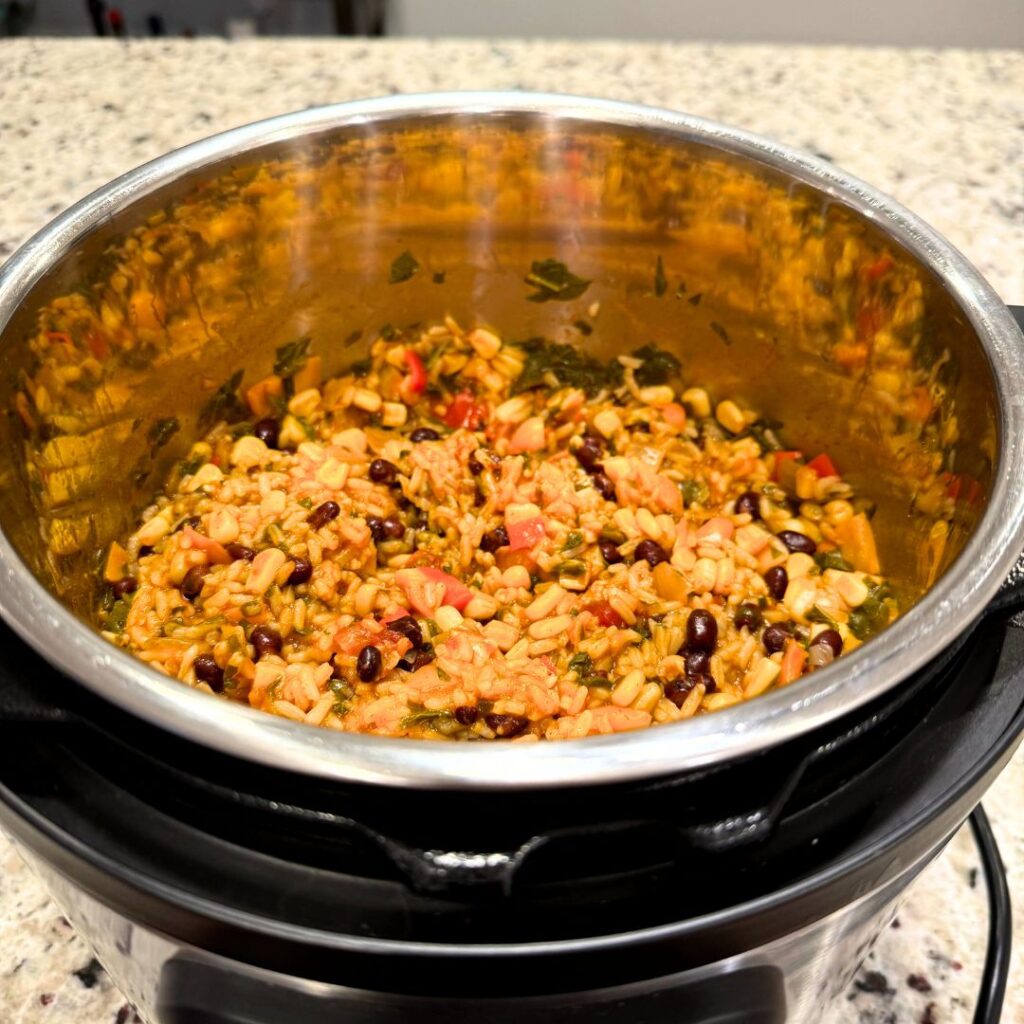
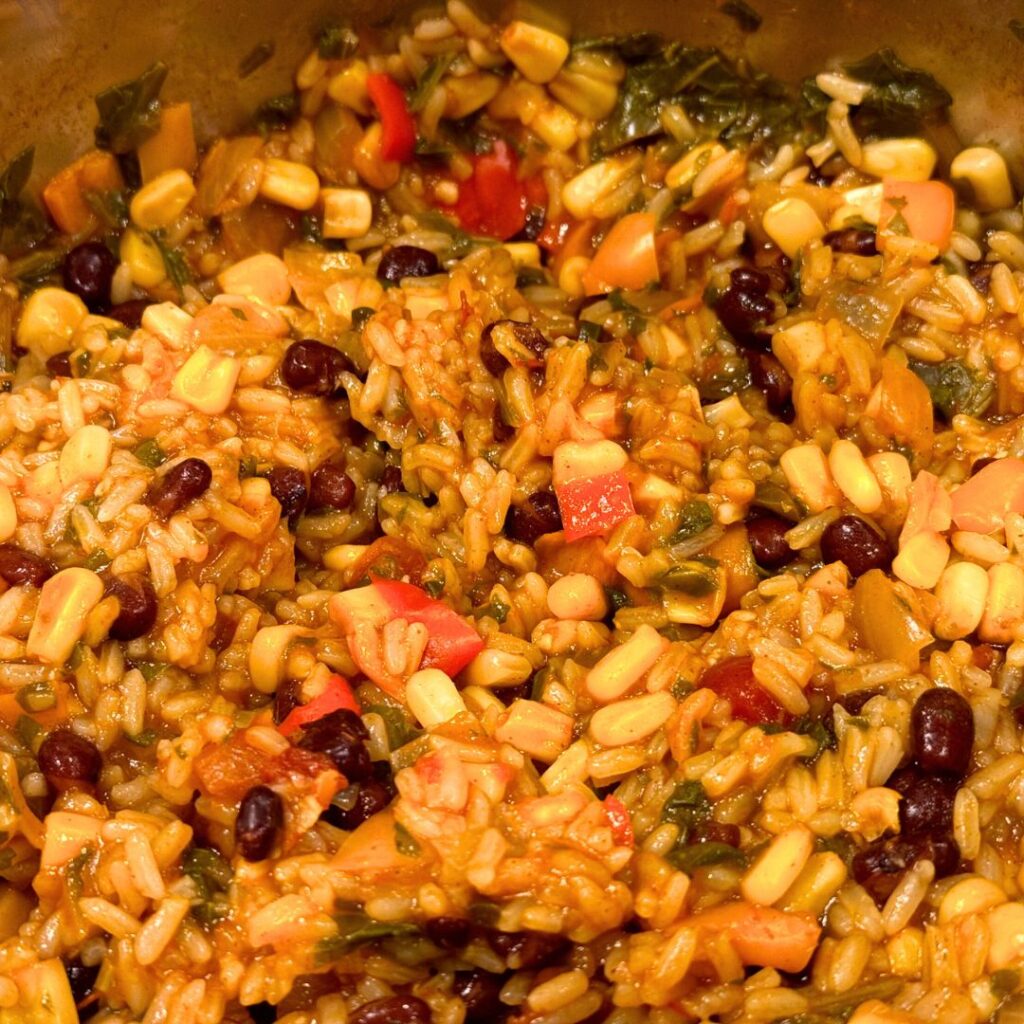
Looking for a flavorful, protein-packed vegan recipe that’s also gluten-free and perfect for meal prep? Look no further! My Vegan Burrito Filling Mixture is loaded with vibrant veggies, hearty black beans, and perfectly cooked rice, all seasoned with classic Mexican-inspired spices. It’s a simple, one-pot wonder that works for weeknight dinners, lunches on the go, or even as a party dish. Trust me, this recipe will be a new staple in your kitchen!
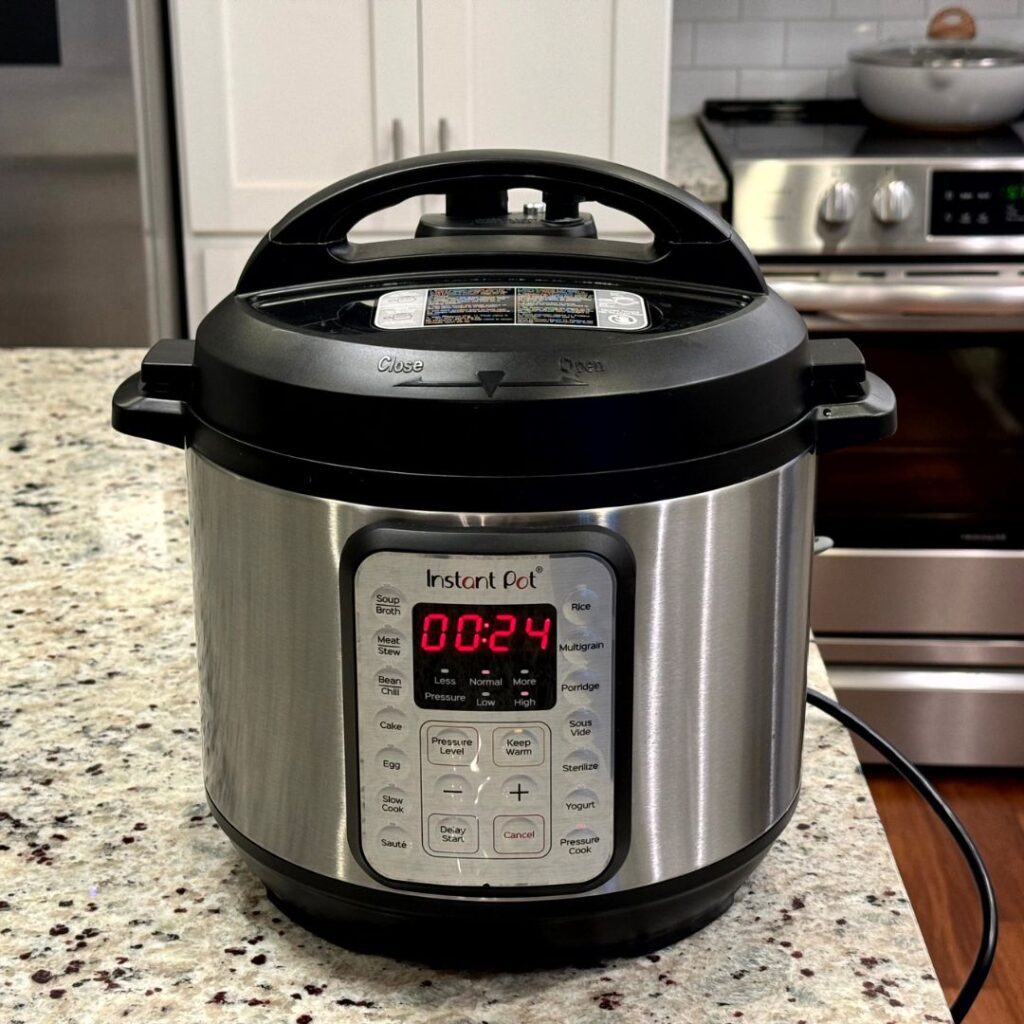
Instant Pot and Stovetop Options
I know everyone’s kitchen setup is different, so I’ve included both Instant Pot and stovetop instructions below. If you love the convenience of set-it-and-forget-it cooking, the Instant Pot version is for you. For those who prefer a more traditional approach, the stovetop recipe delivers equally delicious results with a bit of hands-on care. No matter which method you choose, the end result is a hearty, satisfying dish that’s sure to please.
What Makes a Burrito, Well, a Burrito?
A traditional burrito is all about the balance of textures and flavors. You’ve got your hearty base, usually beans and rice, paired with fresh veggies, tangy salsa, creamy sour cream, and a touch of spice. The magic happens when these elements come together in a soft tortilla wrap. While the classic burrito often includes meat or dairy, this plant-based version proves that you don’t need animal products to create something equally satisfying and delicious.
Versatility at Its Best
The best part about this Vegan Burrito Filling Mixture? It’s incredibly versatile. Sure, you can wrap it up in a gluten-free tortilla for the perfect burrito, but that’s just the beginning. It also makes an amazing rice bowl—just spoon it over your favorite grains and top with shredded lettuce, vegan sour cream, guacamole, and a drizzle of hot sauce. Or, serve it as a filling for taco night or even as a side dish for a larger spread. The possibilities are endless!
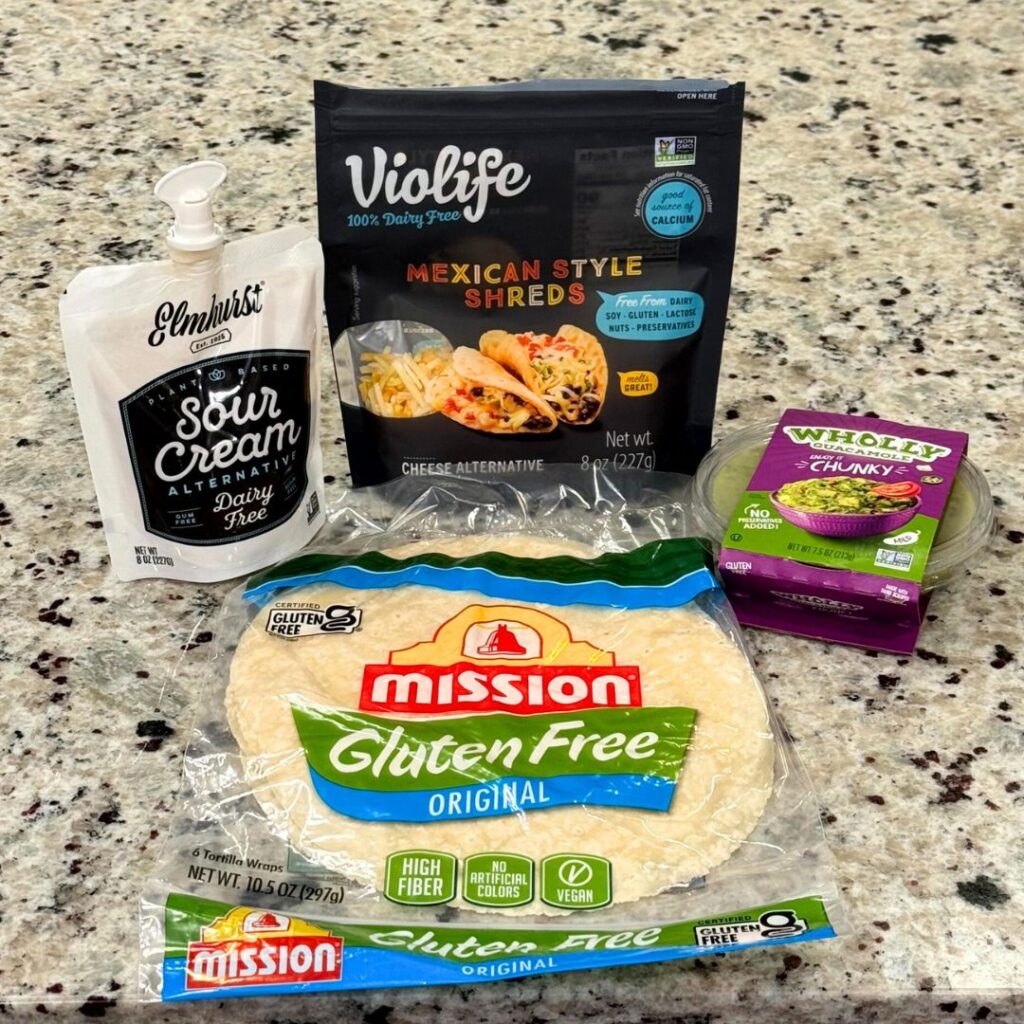
My Favorite Supplies for This Recipe
To make this recipe as easy and seamless as possible, I rely on a few key tools and ingredients that I swear by. Here are my go-to products:
Instant Pot: Perfect for quick and effortless cooking.
Pyrex Bundle: Ideal for meal prep and storing leftovers.
Violife Mexican shredded nondairy cheese (available at most local grocery stores).
Elmhurst dairy-free sour cream (available at Thrive Market).
Wholly chunky guacamole (available at most local grocery stores).
Hearty Vegan Burrito Filling Mixture
Flavor-packed, protein-rich, and incredibly versatile, this gluten-free vegan burrito filling will become your new favorite meal prep staple! Whether you're an Instant Pot pro or a stovetop traditionalist, this recipe has you covered. Get ready to create a satisfying, crowd-pleasing dish in no time!
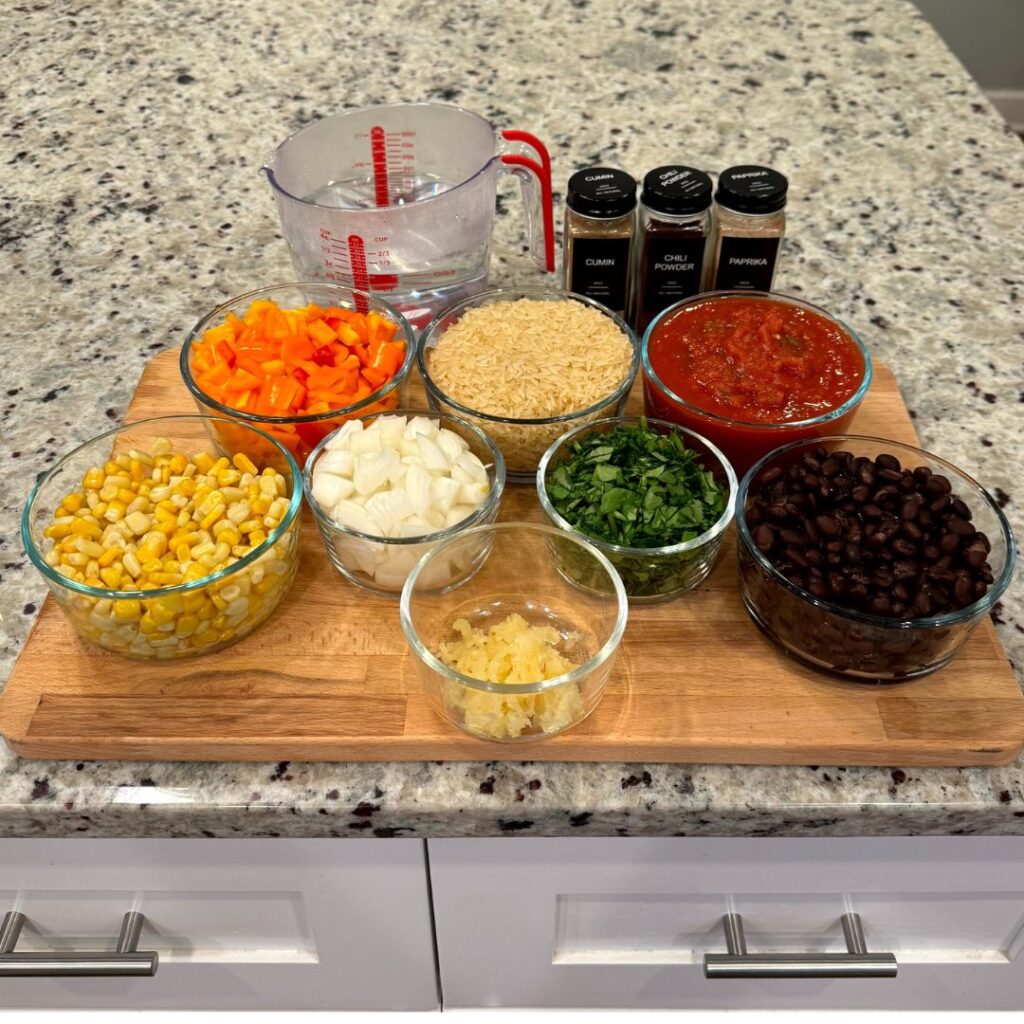
Prep:1. Chop the onions and sweet peppers.2. Mince the garlic.3. Drain and rinse the black beans.4. Rinse the rice thoroughly.5. Finely chop the kale.
Sauté:1. Press "Sauté" on the Instant Pot and add ¼ cup of water.2. Add the onions, sweet peppers, and minced garlic. Cook for 2-3 minutes, stirring, until softened.
Season:1. Sprinkle in cumin, chili powder, paprika, and salt. Stir to coat the vegetables.
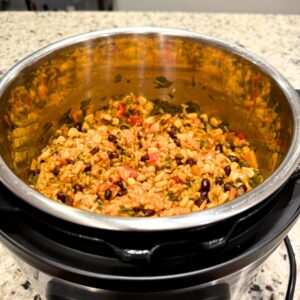
Add Ingredients:1. Turn off the sauté function.2. Add water, black beans, salsa, rice, corn, and kale. Stir well to combine.
Cook:1. Close the lid and set the Instant Pot to high pressure for 24 minutes.2. Allow a natural pressure release for 10 minutes, then carefully release any remaining pressure.3. Stir the mixture to combine.
Serve:1. Assemble your burritos with gluten-free tortillas, shredded lettuce, vegan sour cream, guacamole, and optional hot sauce or jalapeños.
Stovetop Method
Prep:1. Follow the same preparation steps as the Instant Pot method.
Sauté:1. Heat a large pot or skillet over medium heat and add ¼ cup of water.2. Sauté the onions, sweet peppers, and minced garlic for 3-4 minutes until softened.
Season:1. Stir in cumin, chili powder, paprika, and salt. Mix well to coat the vegetables.
Add Ingredients:Add rinsed rice, black beans, corn, kale, salsa, and water. Stir to combine.
Cook:1. Bring the mixture to a boil, then reduce heat to low.2. Cover and simmer for 20-25 minutes, stirring occasionally, until the rice is tender and the liquid is absorbed.
Finish and Fluff:1. Remove from heat and let sit covered for 5 minutes.2. Fluff with a fork before serving.
Serve:1. Enjoy burritos or rice bowls with your favorite toppings!
Keyword Burrito
Try It and Share Your Thoughts!
I hope you give this Vegan Burrito Filling Mixture a try! Whether you’re meal prepping for the week or whipping up a quick dinner, it’s a recipe you’ll love coming back to. Let me know in the comments how you served it and what toppings you chose—I’d love to hear your ideas! Don’t forget to share this recipe with your fellow vegan foodies and tag me if you post your creations on social media. Enjoy!
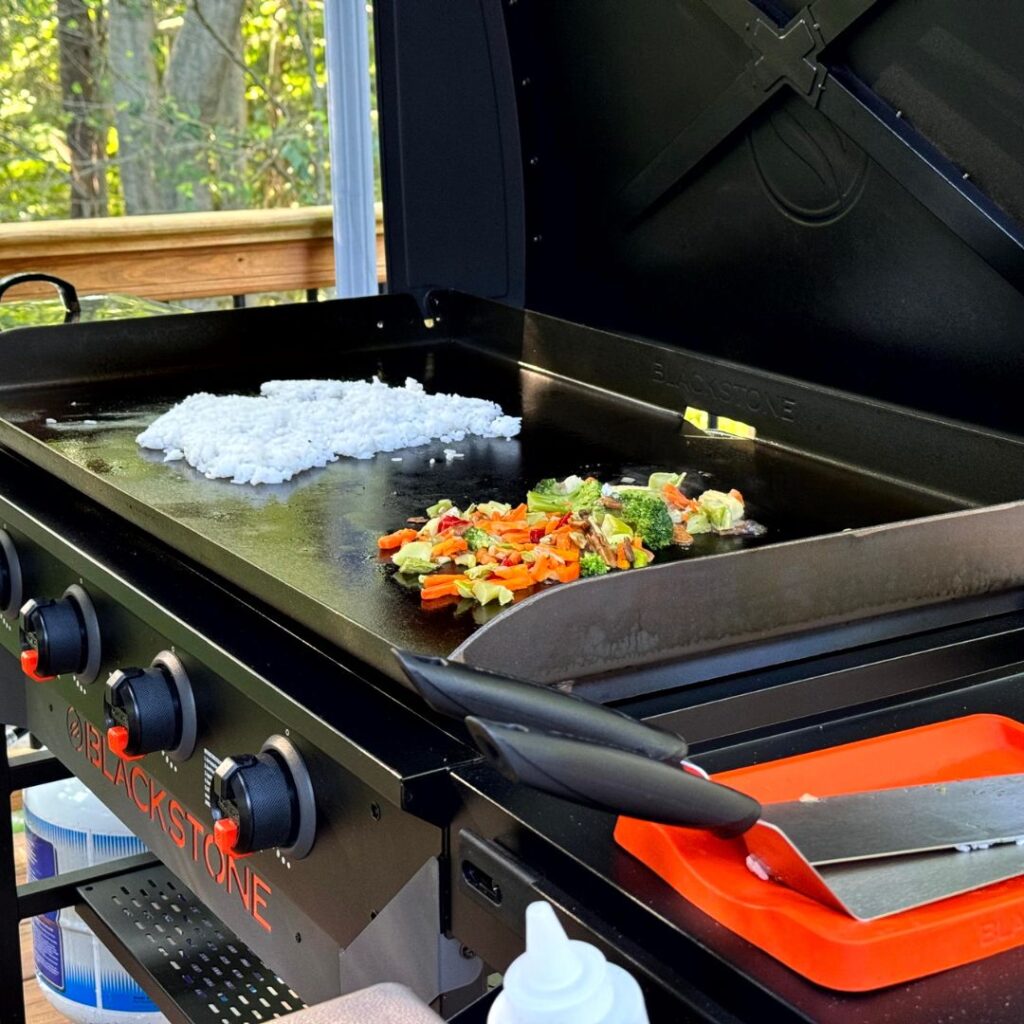
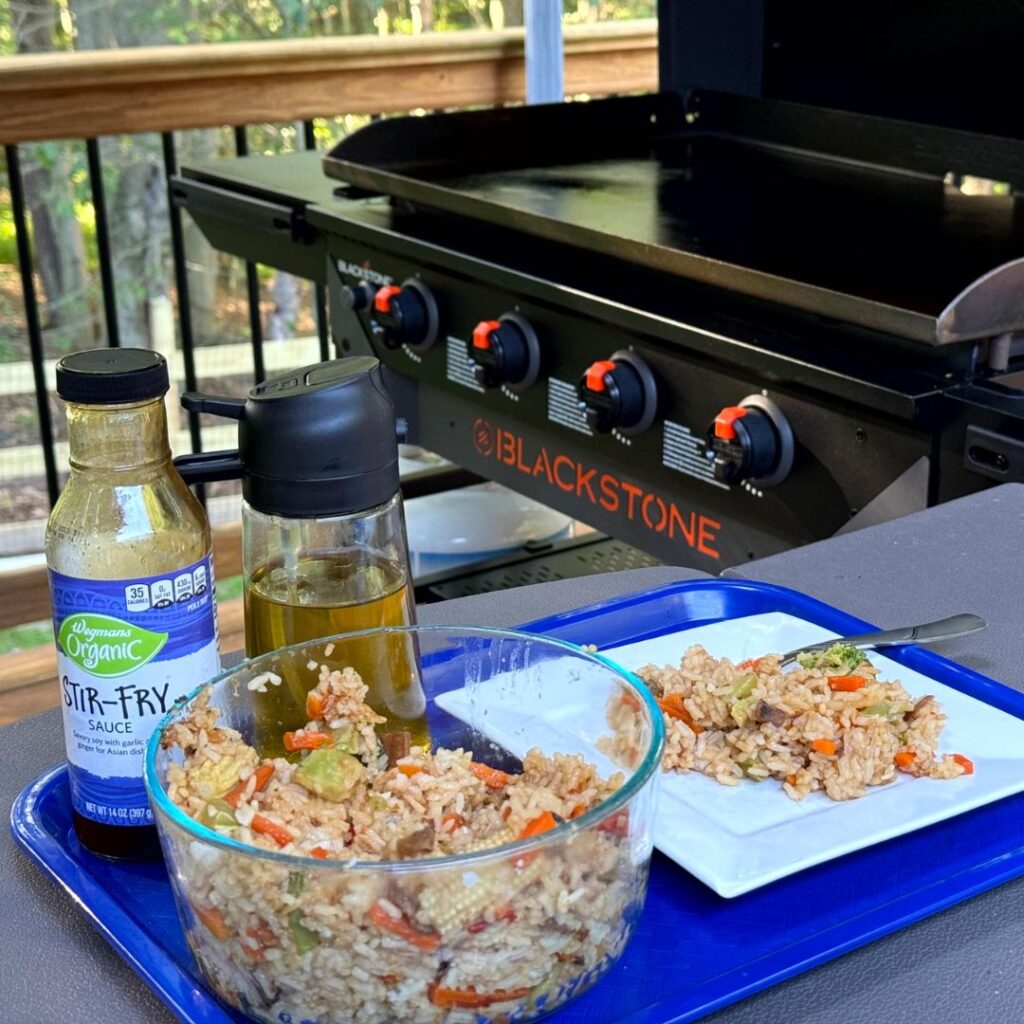
Cooking a delicious, well-balanced meal doesn’t have to be complicated, especially when you’ve got a Blackstone griddle on hand. Whether you’re whipping up a quick weeknight dinner or a laid-back weekend meal, the Blackstone makes it easy to cook all three components of this stir fry recipe. With just a few simple ingredients, you can have a vibrant, flavorful meal on the table in no time.
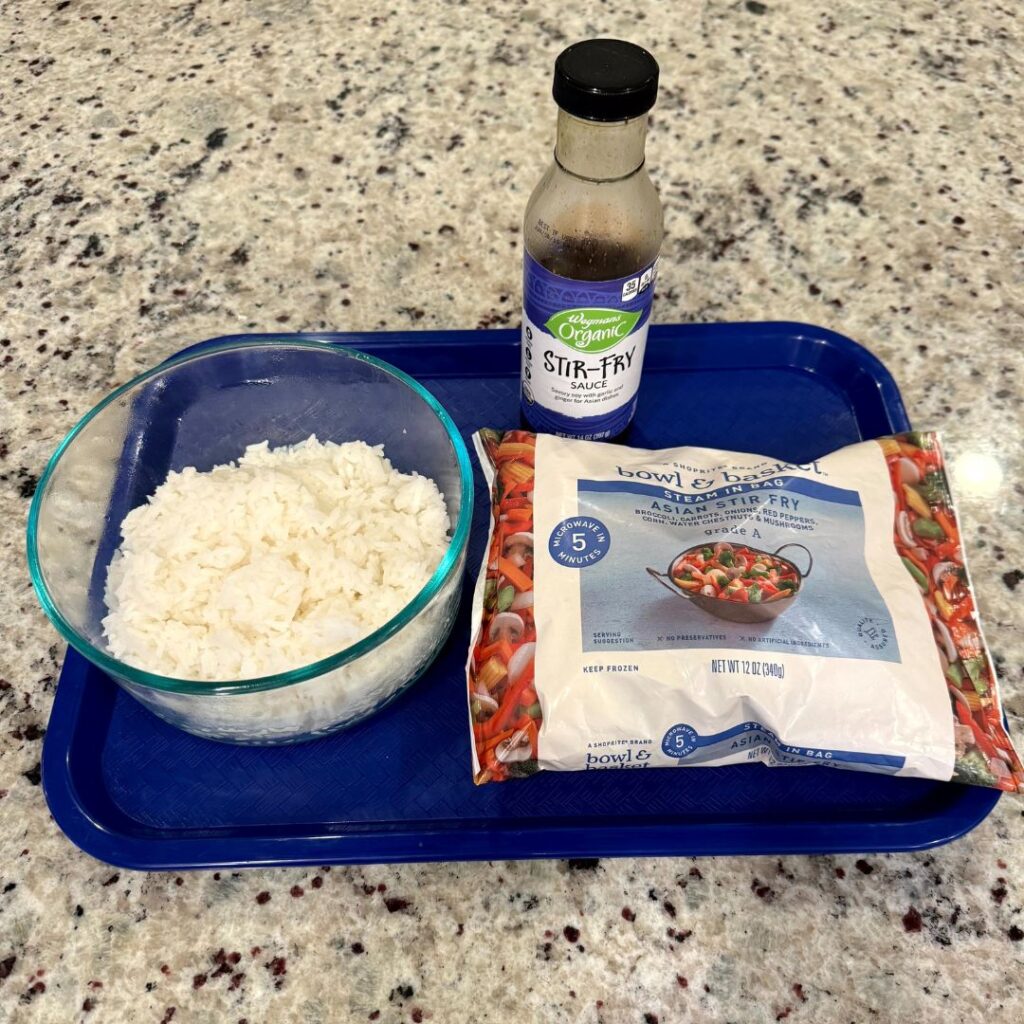
This stir fry recipe is as simple as it gets, requiring just three main ingredients: your favorite jasmine rice, a stir fry sauce of your choice, and a frozen bag of stir fry veggies. It’s the perfect quick-fix meal when you’re short on time but still want something tasty and nutritious. If you’ve got a bit more time, feel free to elevate the dish by using fresh vegetables and a homemade sauce. Either way, the Blackstone griddle ensures everything cooks up perfectly.
To get this recipe started, make sure to cook your jasmine rice ahead of time. If you need a refresher on how to achieve that perfect fluffy texture, check out my video and blog post on mastering jasmine rice on the stovetop. Pre-cooking the rice not only saves time but also makes the entire cooking process smoother, allowing you to focus on getting those veggies just right on the griddle.
How to get started
Prep:
Cook the Rice: Start by cooking 2 cups of jasmine rice on the stove. (For a perfect stovetop jasmine rice recipe, check out my video and blog post.)
Prepare the Veggies: Place your frozen veggies into a bowl, ready to be used.
Get the Tray Ready: Set up a tray to hold your cooked ingredients.
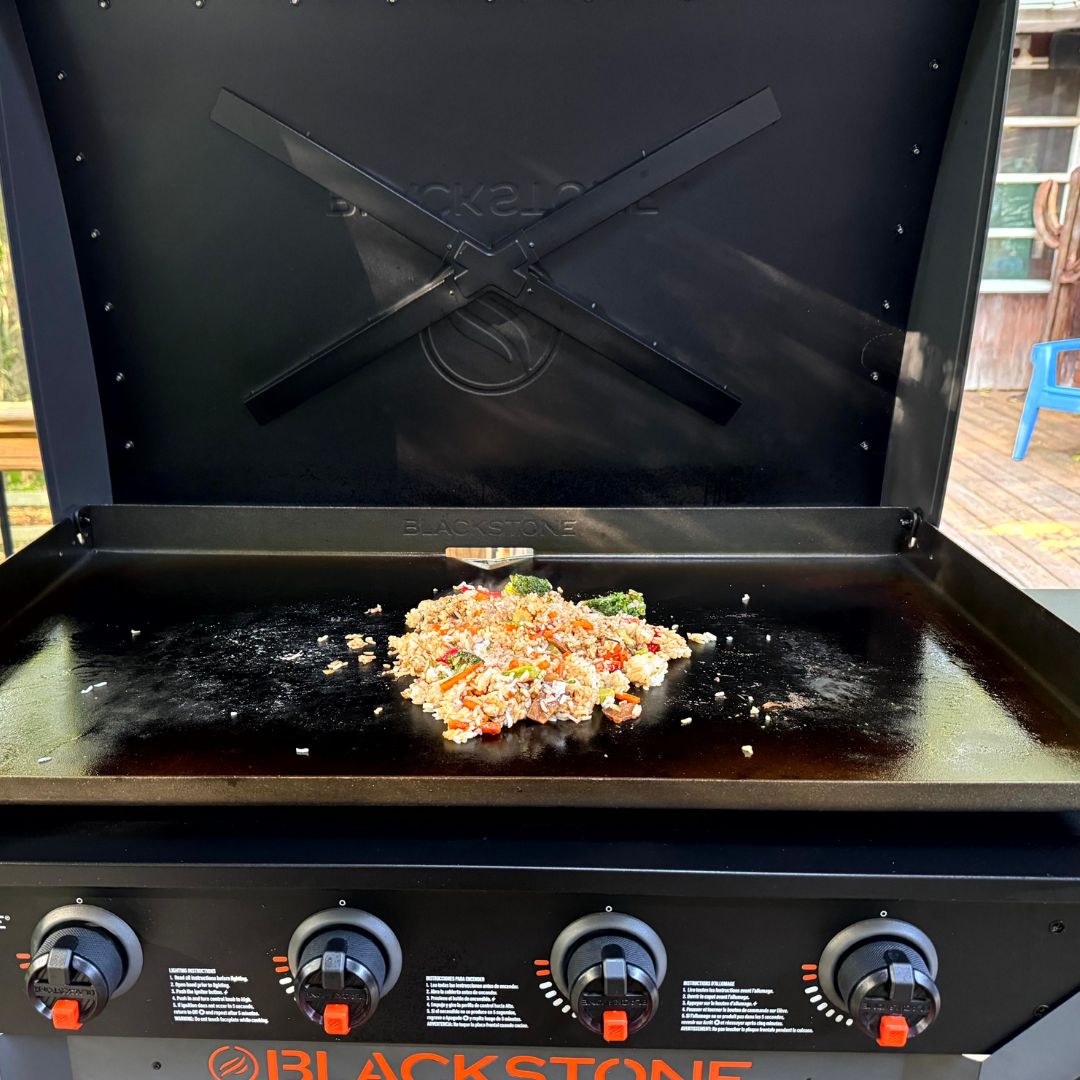
Preheat the Blackstone: Heat your Blackstone griddle to 375°F.
Cook:
Oil the Grill: Spray a generous amount of avocado oil on the preheated grill.
Defrost the Veggies: Add the frozen veggies to the grill and cook until they are fully defrosted.
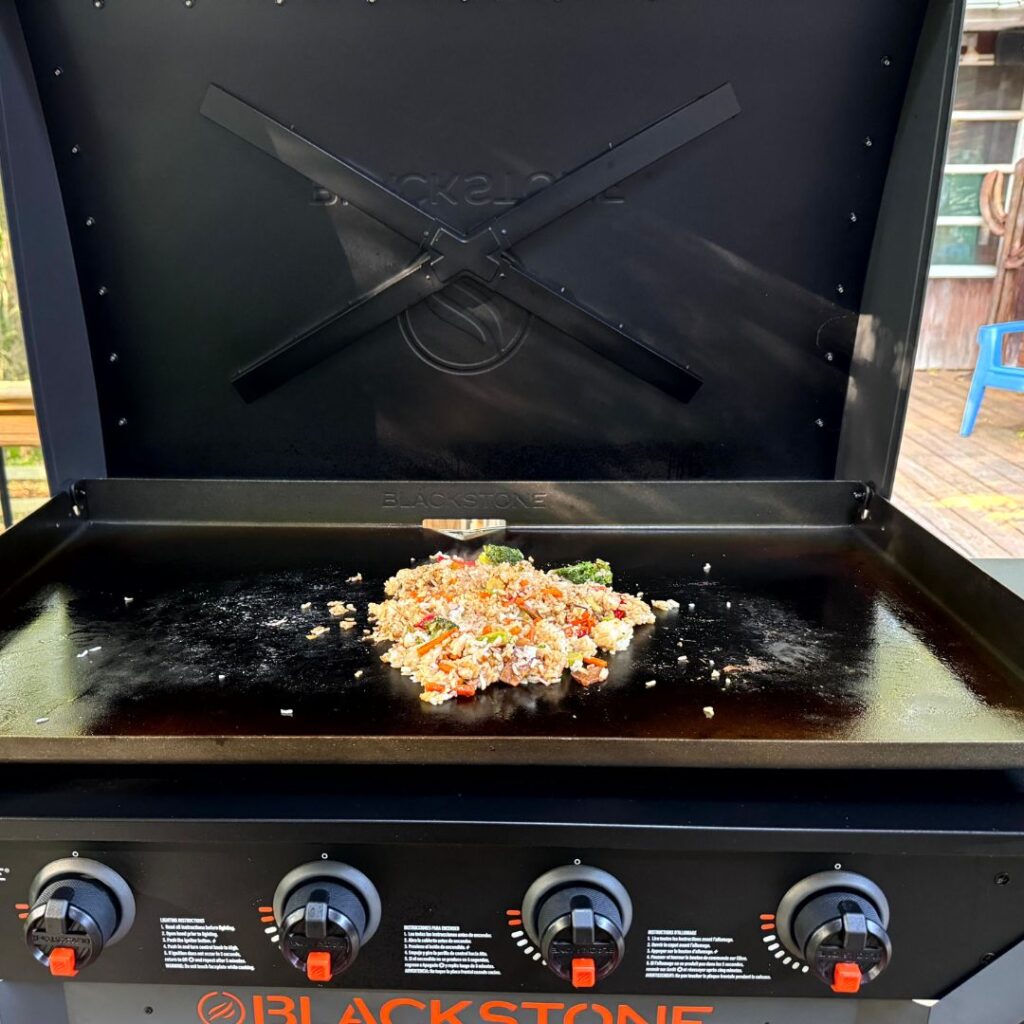
Add the Rice: Once the veggies are defrosted, add the cooked jasmine rice to the grill. Stir frequently to ensure everything is evenly mixed and heated through.
Mix and Sauce: Combine the rice and veggies thoroughly. Add ⅓ cup of teriyaki sauce and mix it all up, letting the flavors meld together.
Final Cook: Continue cooking for about 5 minutes, stirring occasionally, until everything is heated through and slightly caramelized.
When it comes to cooking on the Blackstone, having the right tools can make all the difference. Here are a few of my must-haves:
In conclusion, this stir fry recipe is a fantastic way to enjoy a quick, satisfying meal with minimal effort. Whether you’re using frozen veggies and store-bought sauce for convenience or going the extra mile with fresh ingredients, the Blackstone griddle ensures everything turns out delicious. Don’t forget to check out my linked resources for more tips, tools, and tricks to make your cooking experience even better!
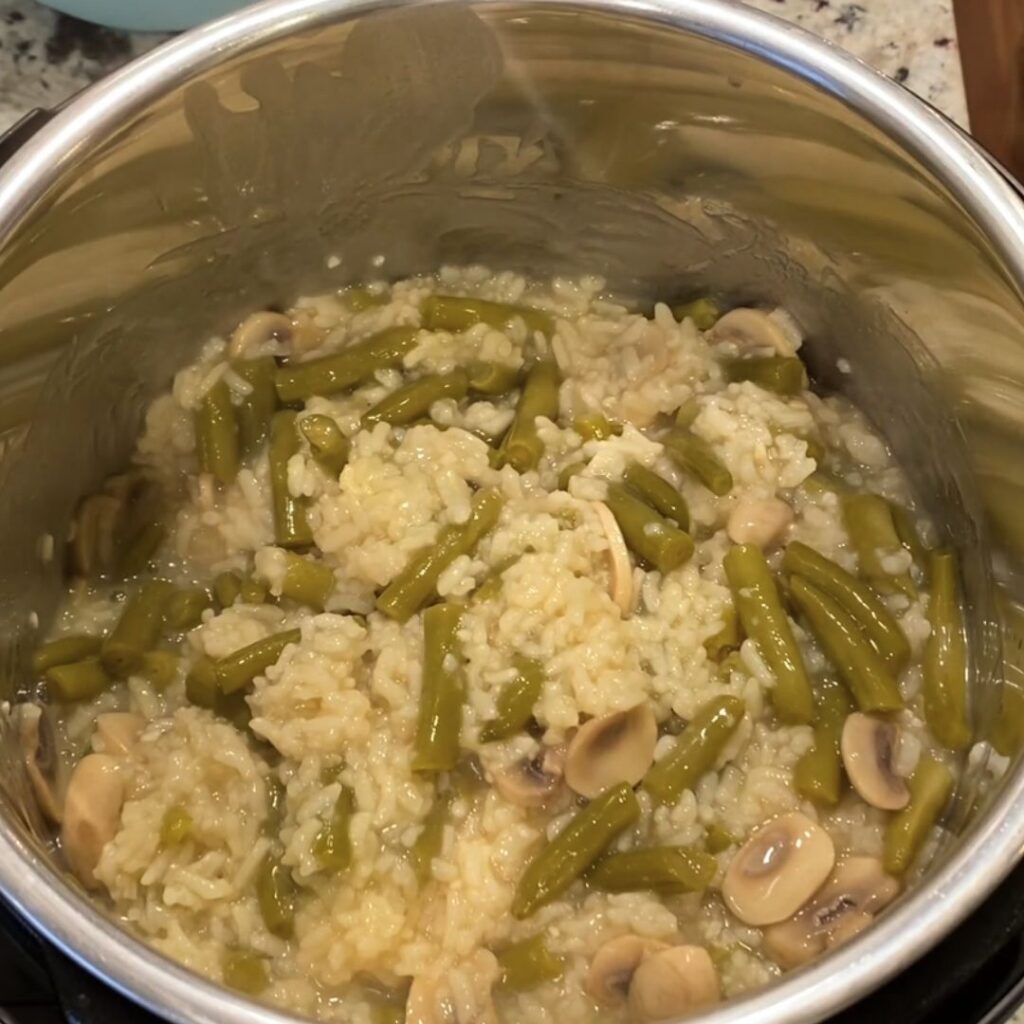
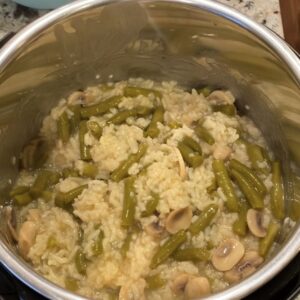
Are you craving a creamy, comforting bowl of risotto but dread the thought of standing over the stove, endlessly stirring? Say hello to your new kitchen superhero: the Instant Pot. With its set-it-and-forget-it convenience, making risotto has never been easier or more hassle-free. Today, we’re diving into the delightful world of Easy Vegan No-Stirring Mushroom Risotto cooked to perfection in the Instant Pot.
Incorporating nutritional yeast into your Easy Vegan Mushroom Risotto brings a multitude of benefits to the dish. Firstly, nutritional yeast enriches the risotto with a savory, cheesy flavor, enhancing its overall taste profile without the need for dairy products. This is particularly advantageous for those following a vegan or lactose-free diet, allowing them to enjoy the creamy richness of risotto while adhering to their dietary preferences. Additionally, nutritional yeast is a nutritional powerhouse, boasting a wealth of essential vitamins and minerals, including B vitamins like B12, which can be challenging to obtain from plant-based sources alone.
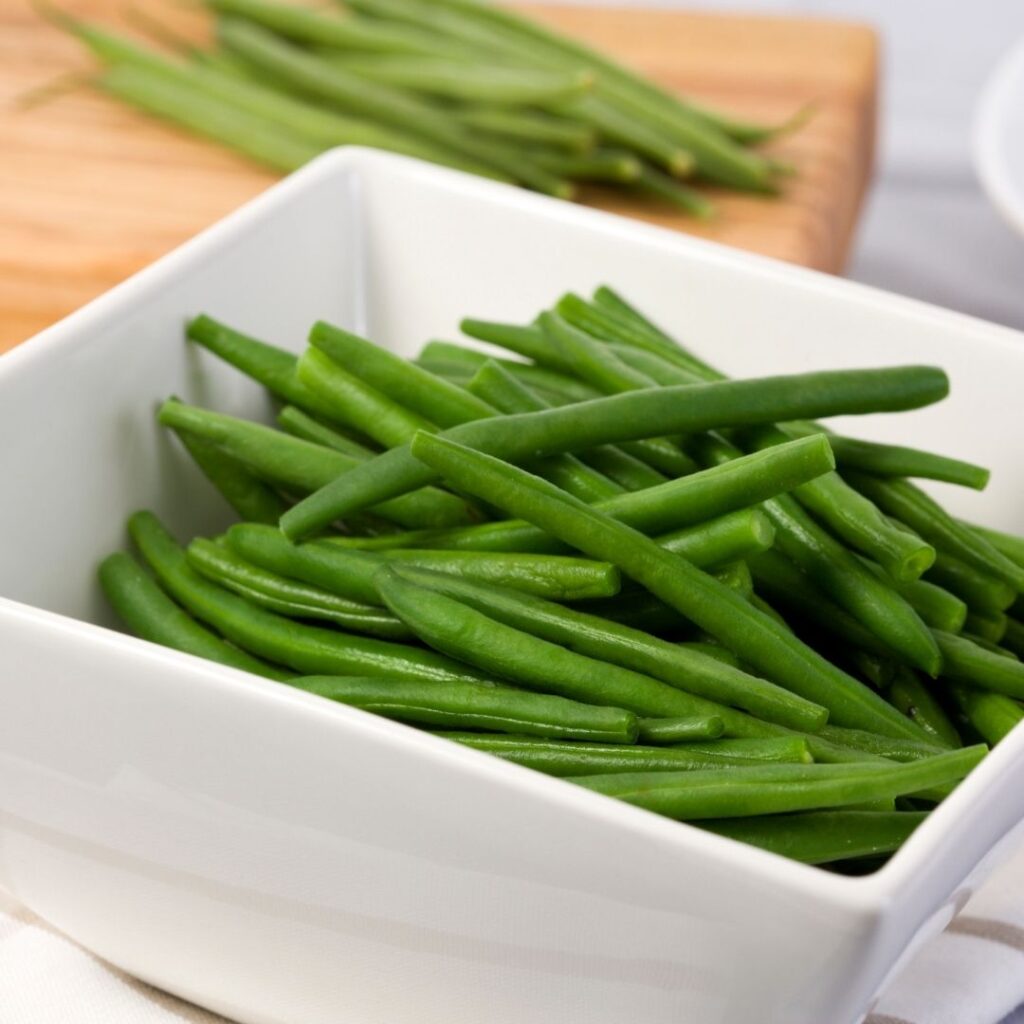
When it comes to incorporating green beans into your Easy Vegan Mushroom Risotto, the choice between fresh and canned offers distinct advantages. Opting for fresh green beans lends a vibrant crunch and a burst of garden-fresh flavor to your risotto. Their crisp texture adds a delightful contrast to the creamy rice base, elevating the dish to new heights of sensory delight. On the other hand, canned green beans provide convenience and time-saving benefits, as they can be effortlessly incorporated once the Instant Pot has finished cooking. While they may lack the crispness of their fresh counterparts, canned green beans offer a tender, succulent bite and ensure a quick and hassle-free meal preparation. Ultimately, whether you choose fresh or canned green beans depends on your preference for texture, flavor, and convenience, but rest assured, both options promise a delicious outcome in this effortless risotto recipe.
Instant Pot Mushroom Risotto
Are you craving a creamy, comforting bowl of risotto but dread the thought of standing over the stove, endlessly stirring? Say hello to your new kitchen superhero: the Instant Pot.
2cansgreen beans15 oz. or 2 cups of fresh chopped green beans
Instructions
Prep: Begin by rinsing and dicing the mushrooms. Then, portion and rinse the arborio rice in a colander.
Saute: Start the Instant Pot on the saute function. Add water and minced garlic, allowing them to cook for about 5 minutes.
Add Ingredients: Cancel the saute function, then add the mushrooms, vegetable broth, and rice to the pot. Stir in the nutritional yeast thoroughly.
Cook: Lock the lid of the Instant Pot and set it to pressure cook for 7 minutes, followed by a 5-minute natural release.
Mix: Once the pressure has been released, open the lid and add the canned green beans. Allow the mixture to sit for a few minutes before serving, allowing the flavors to meld together.
Notes
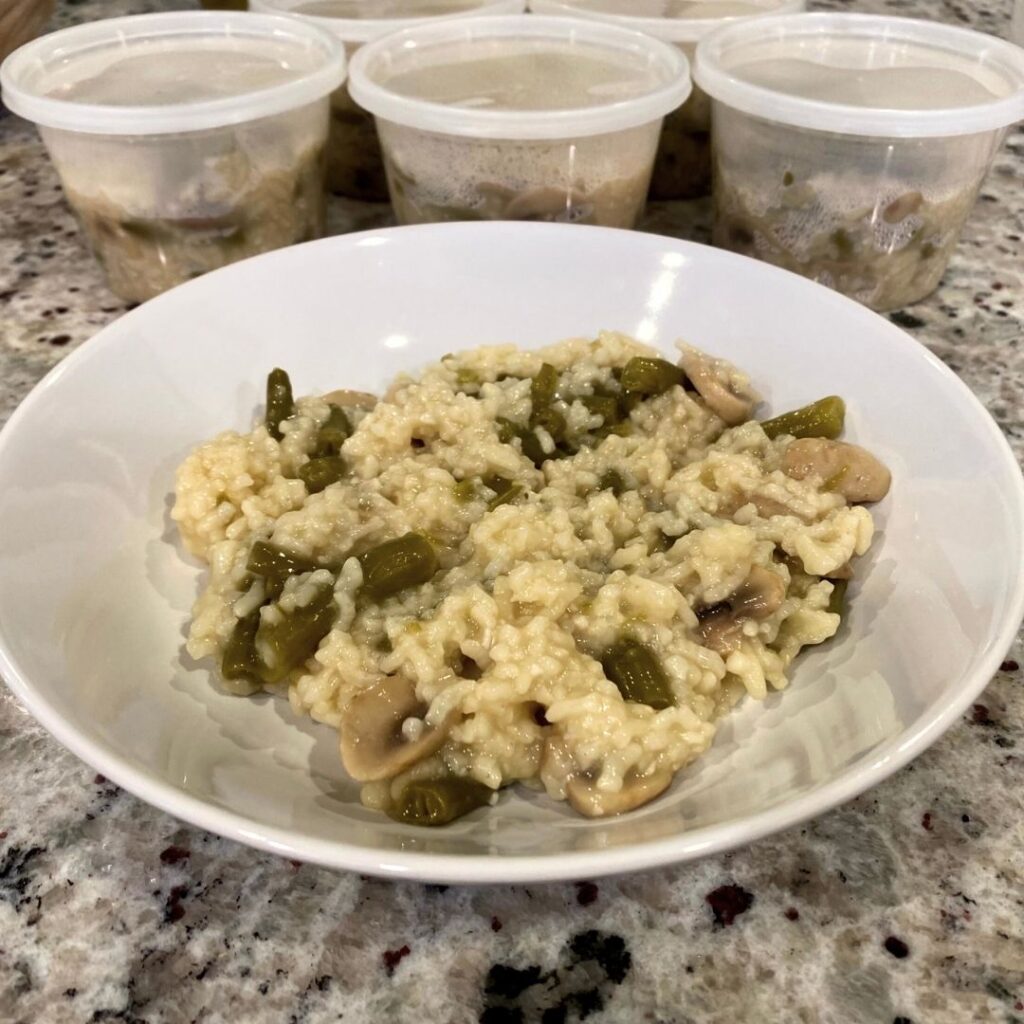
Tip: This recipe yields approximately 7 pint-sized portions, perfect for meal prep. Store leftovers in the refrigerator for up to 4 days, or freeze for later enjoyment.
With the Instant Pot handling the heavy lifting, you can indulge in creamy, flavorful risotto without the constant stirring and monitoring typically associated with traditional stovetop methods. Whether you’re a busy weeknight warrior or simply seeking fuss-free cooking solutions, this Easy Vegan Mushroom Risotto will undoubtedly become a staple in your culinary repertoire. So, dust off that Instant Pot and get ready to impress your taste buds with minimal effort and maximum flavor!
Are you constantly scrambling for meal ideas during the hectic workweek? Do you find it challenging to balance healthy eating with a busy schedule? If so, you’re not alone. Many of us struggle to find the time and energy to cook nutritious meals every day. But what if I told you there’s a simple solution that can save you time and stress while still prioritizing your health and well-being?
Welcome to Episode 1 of Vegan Gluten-Free Weekly Meal Prep! In this video, I’m excited to share my weekly ritual of preparing delicious vegan and gluten-free meals every Sunday. Join me as I walk you through my process, from selecting recipes to portioning out meals for the week ahead.
Let’s dive right in! Meal prep is a game-changer for busy individuals and families alike. By dedicating just a few hours on the weekend to preparing meals in advance, you can enjoy stress-free eating throughout the week.
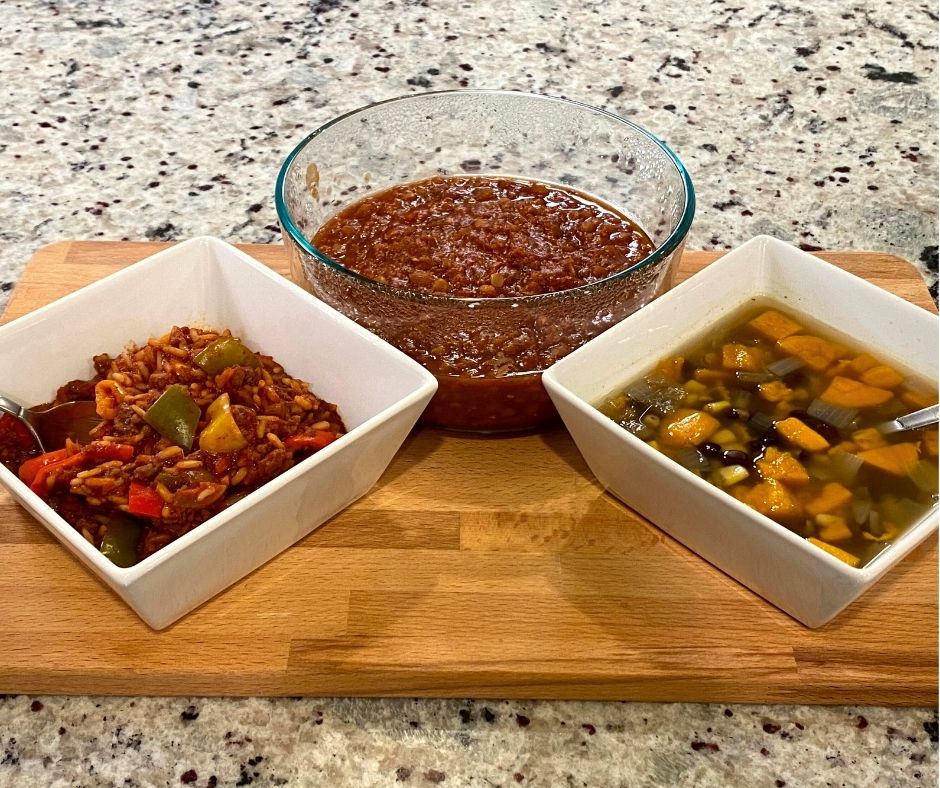
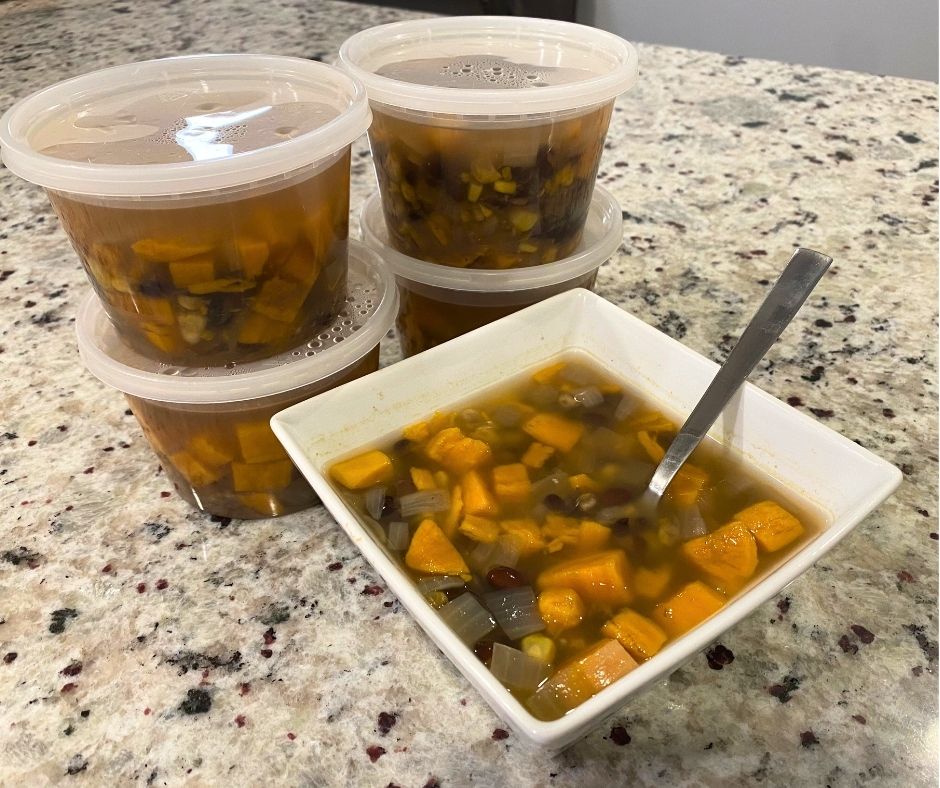
Sweet Potato Black Bean Soup Recipe
Soup First up on the menu is a hearty Sweet Potato Black Bean Soup. Packed with flavor and nutrients, this soup is the perfect way to kick off your week. Simply follow the recipe on my website, and feel free to customize it with your favorite spices and toppings.
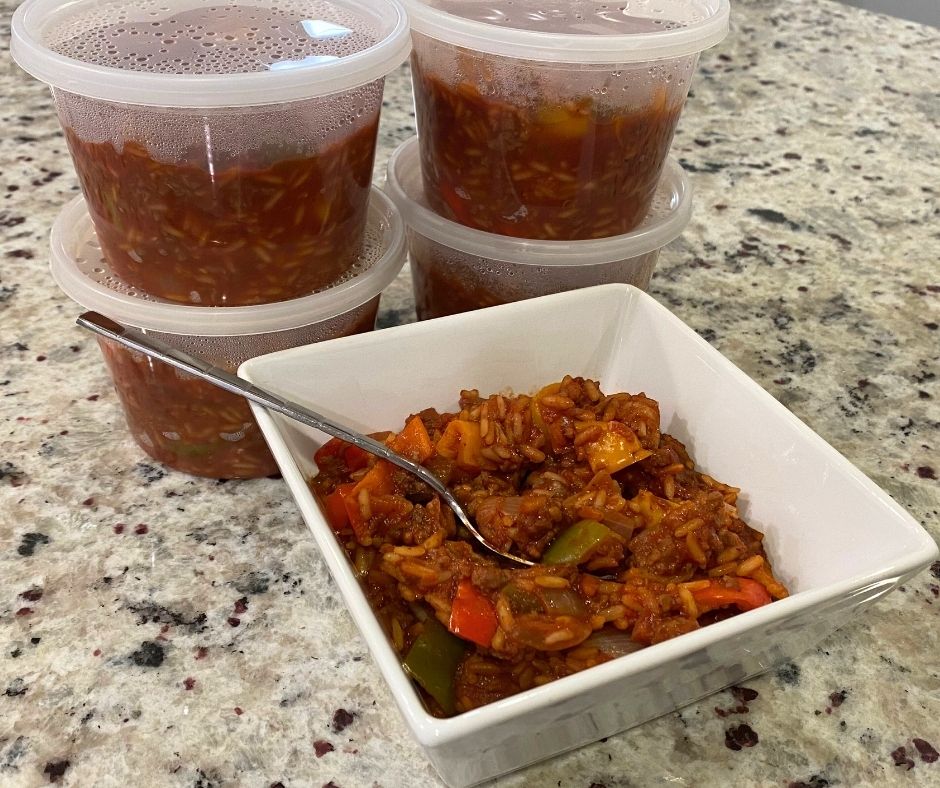
Impossible Meat Unstuffed Peppers Stew Recipe
For a quick and easy lunch option, try my Impossible Meat Unstuffed Peppers stew. Made with plant-based protein and rice both delicious and satisfying. Feel free to add your favorite toppings and condiments for extra flavor.
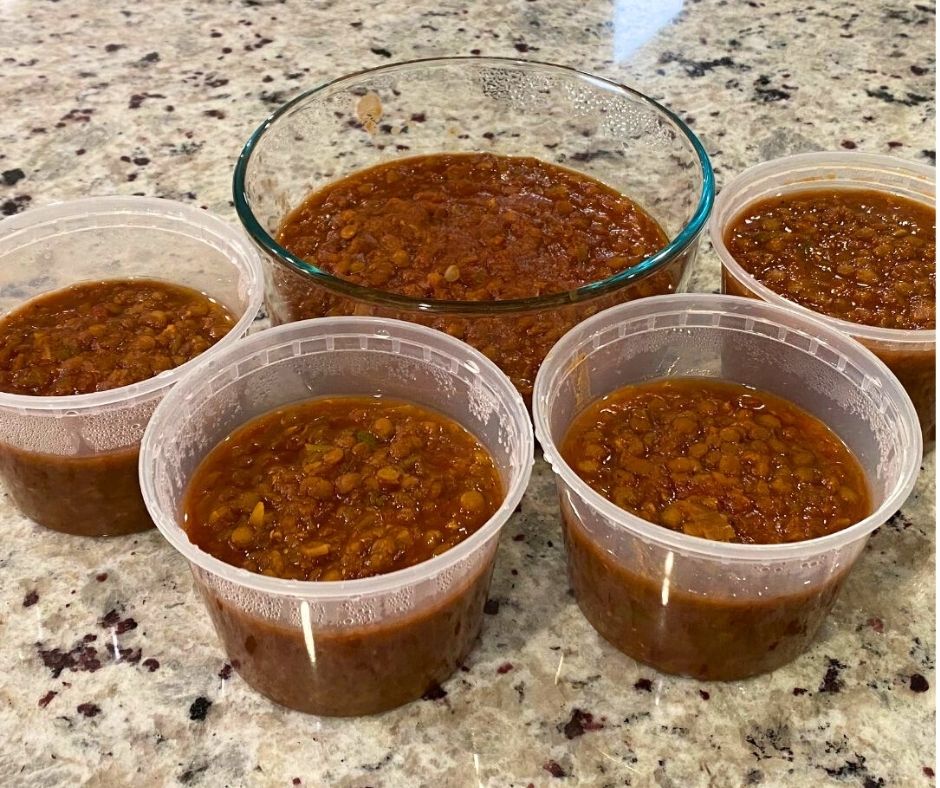
Lentil Sloppy Joes Sandwiches Recipe
Next, we have a comforting Lentil Sloppy Joes sandwich. This vegan twist on a classic favorite is sure to satisfy even the pickiest eaters in your family. With just a few simple ingredients, you can create a hearty and nutritious meal that will keep you fueled for hours
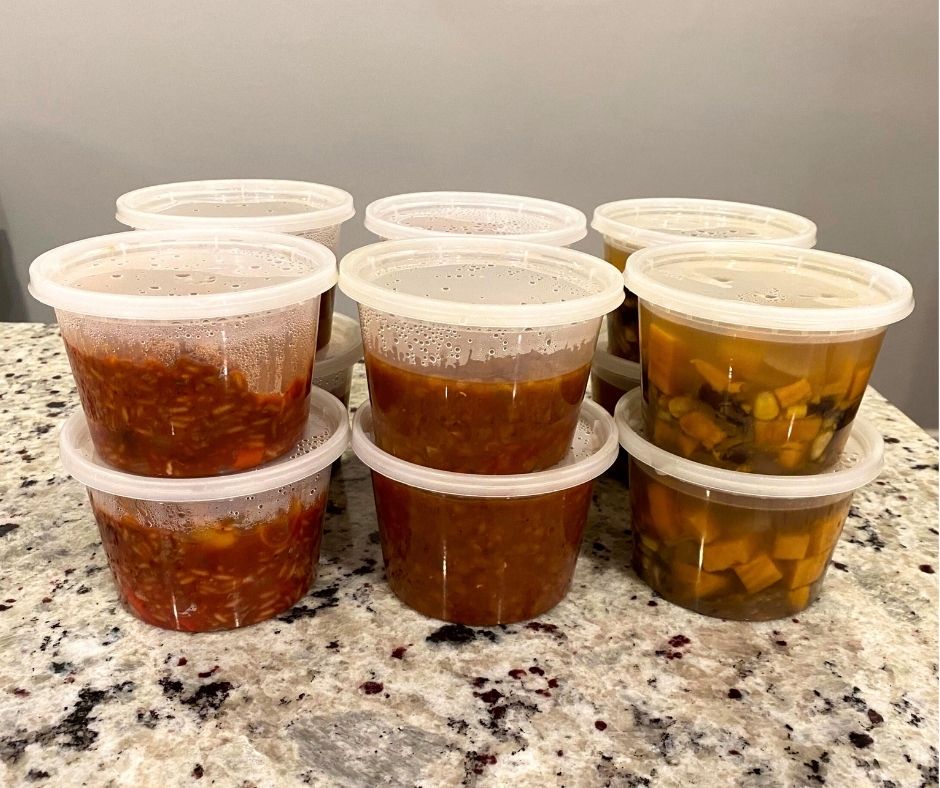
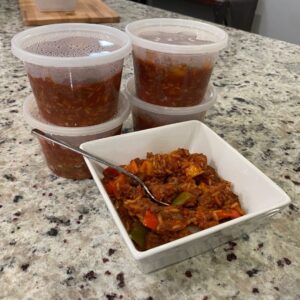
Portion and enjoy Once you’ve prepared all your meals, it’s time to portion them out into individual containers for easy grab-and-go access. I recommend using 16 oz. pint containers to keep your meals fresh and organized throughout the week.
Invest in quality kitchen equipment, such as an Instant Pot and Pyrex bundle, to streamline the cooking process.
Stock up on essential supplies, like vegetable broth cubes and measuring cups, to ensure you have everything you need on hand.
These Amazon Affiliate links incur no additional cost when clicked, and they help support content creators like myself.
Ready to simplify your week with vegan gluten-free meal prep? Give these recipes a try and enjoy delicious, stress-free eating all week long. Happy cooking!
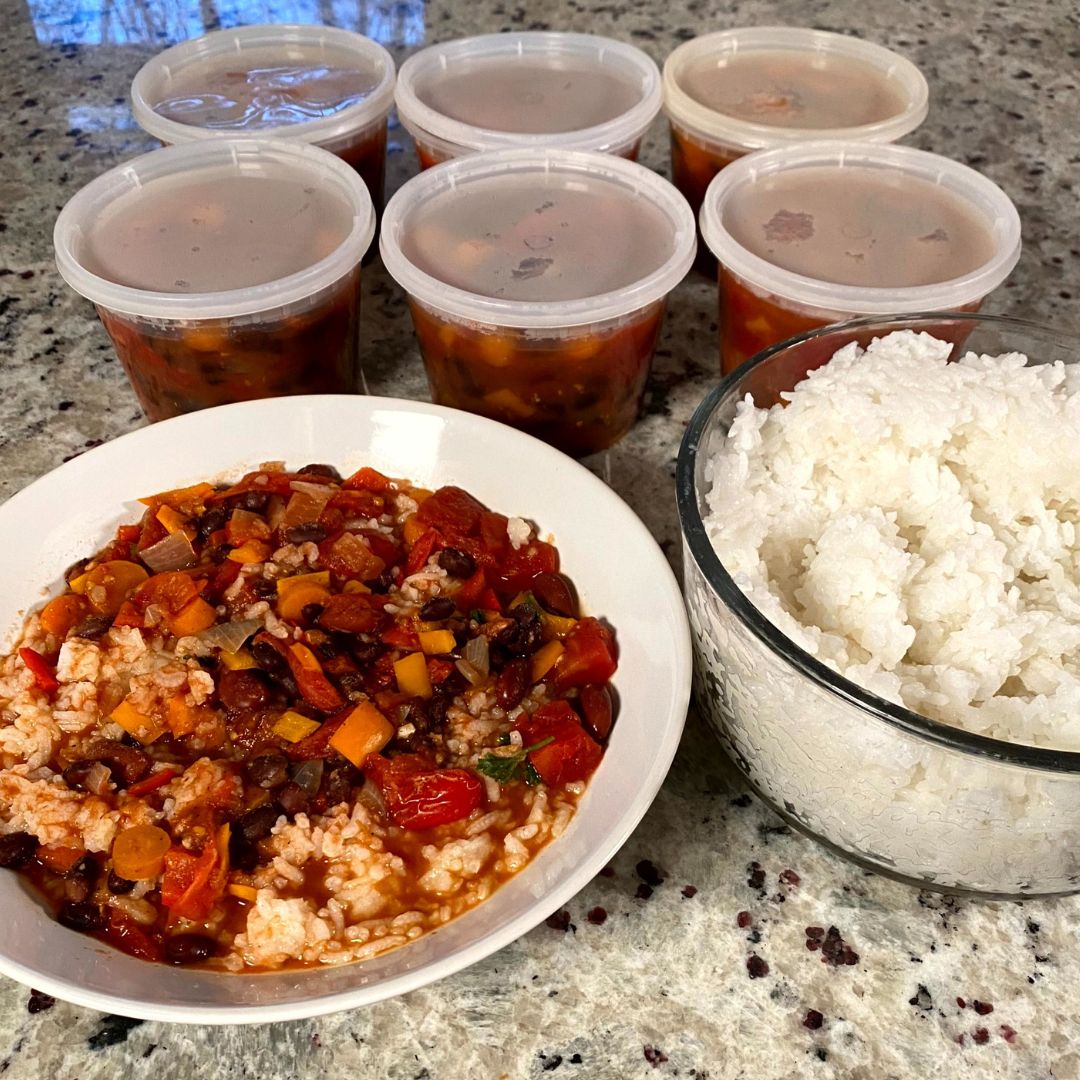
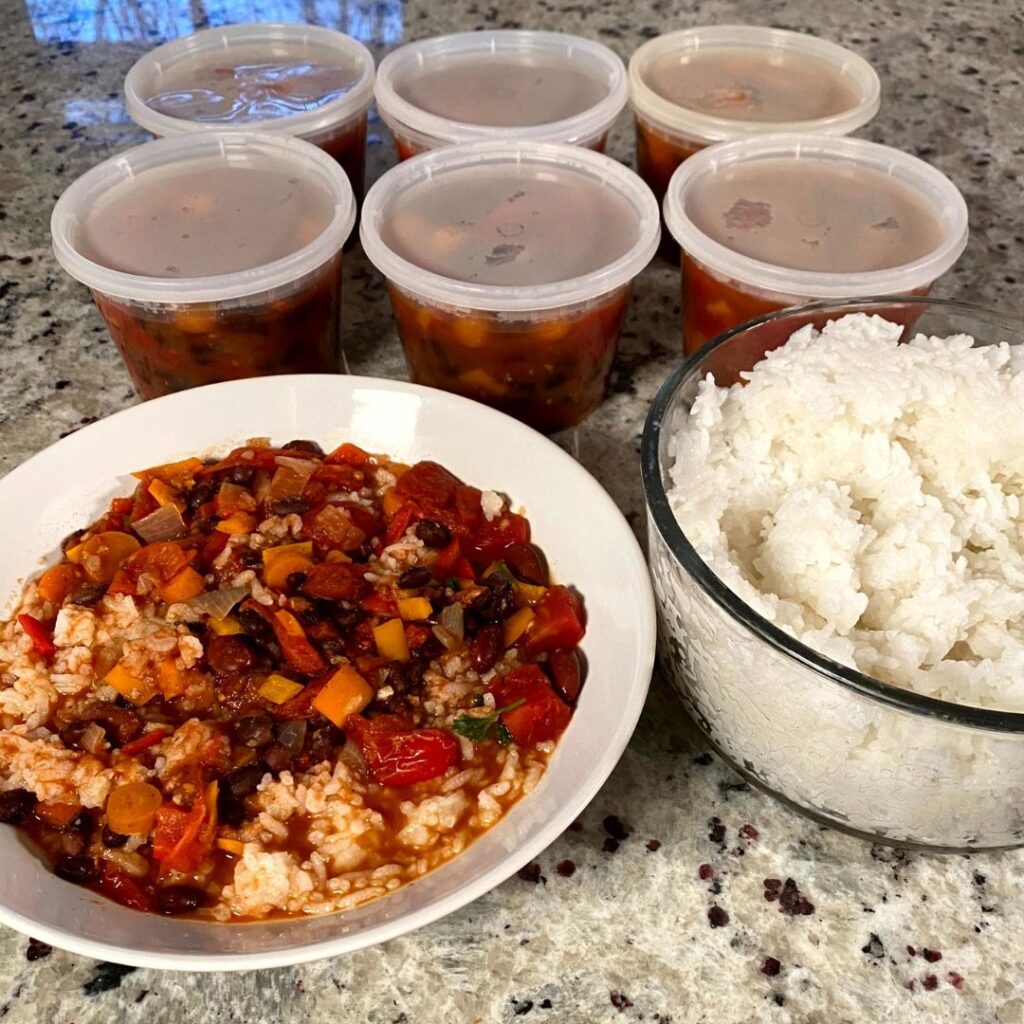
Are you looking for a hearty, nutritious, and easy-to-make meal? Look no further than this Instant Pot Vegan Black Bean Chili recipe. Packed with protein, fiber, and essential nutrients, this dish is not only delicious but also incredibly beneficial for your health. This recipe can be made in the instant pot like shown in my video or the on stove top by just adding all the ingredients to the pot and cook until the carrots and celery are fully cooked.
Benefits of Eating Beans
Before diving into the recipe, let’s explore why beans are such a fantastic addition to your diet:
Rich in Protein: Beans are an excellent source of plant-based protein, making them a great option for vegetarians and vegans. Protein is essential for muscle repair and growth, as well as overall body function.
High in Fiber: Beans are loaded with dietary fiber, which aids in digestion, helps maintain a healthy weight, and keeps you feeling full and satisfied after meals.
Packed with Nutrients: Beans are packed with vitamins and minerals, including folate, iron, magnesium, and potassium. These nutrients are crucial for various bodily functions, such as energy production, red blood cell formation, and bone health.
Heart Health: Consuming beans regularly has been linked to a reduced risk of heart disease. Their high fiber content helps lower cholesterol levels, while their potassium content supports healthy blood pressure levels.
Blood Sugar Regulation: The complex carbohydrates found in beans are digested slowly, resulting in steady blood sugar levels. This can be particularly beneficial for individuals with diabetes or those looking to manage their blood sugar levels.
Prepare Ingredients: Begin by rinsing, and draining the beans. Then, dice the peppers, carrots, and onion as instructed.
Saute Vegetables: Switch on the Saute mode on your Instant Pot. Add ½ cup of vegetable broth and cook the diced onions for a few minutes until softened. Next, add the minced garlic, carrots, and diced peppers, allowing them to cook for an additional two minutes.
Seasoning: Stir in all the spices. Once combined, turn off the Saute mode.
Add Ingredients to Instant Pot: Pour in the remaining 2 ½ cups of vegetable broth, along with the diced tomatoes, and beans. Give everything a good stir to ensure all ingredients are well incorporated.
Pressure Cook: Lock the lid of the Instant Pot in place and set the timer to 5 minutes on high pressure.
Natural Release: Once the Instant Pot timer beeps, allow for a 5-minute natural release before manually releasing any remaining pressure.
Combine Ingredients: After releasing the pressure, stir in the parsley and diced fresh tomatoes until evenly distributed. Let the mixture cool for 5 minutes before serving.
Serve or Store: Enjoy your Instant Pot Vegan Black Bean Chili immediately, or store it in containers for convenient meals throughout the week.
Notes
You could always substitute the spices for a pre-portion chili seasoning packet.
Keyword Black Beans, Chili, Rice
In conclusion, this Instant Pot Vegan Black Bean Chili is not only a flavorful and satisfying meal but also a nutritional powerhouse. Incorporating beans into your diet regularly can provide numerous health benefits, making this dish a must-try for anyone looking to improve their overall well-being. So, grab your Instant Pot and get cooking – your taste buds and your body will thank you!
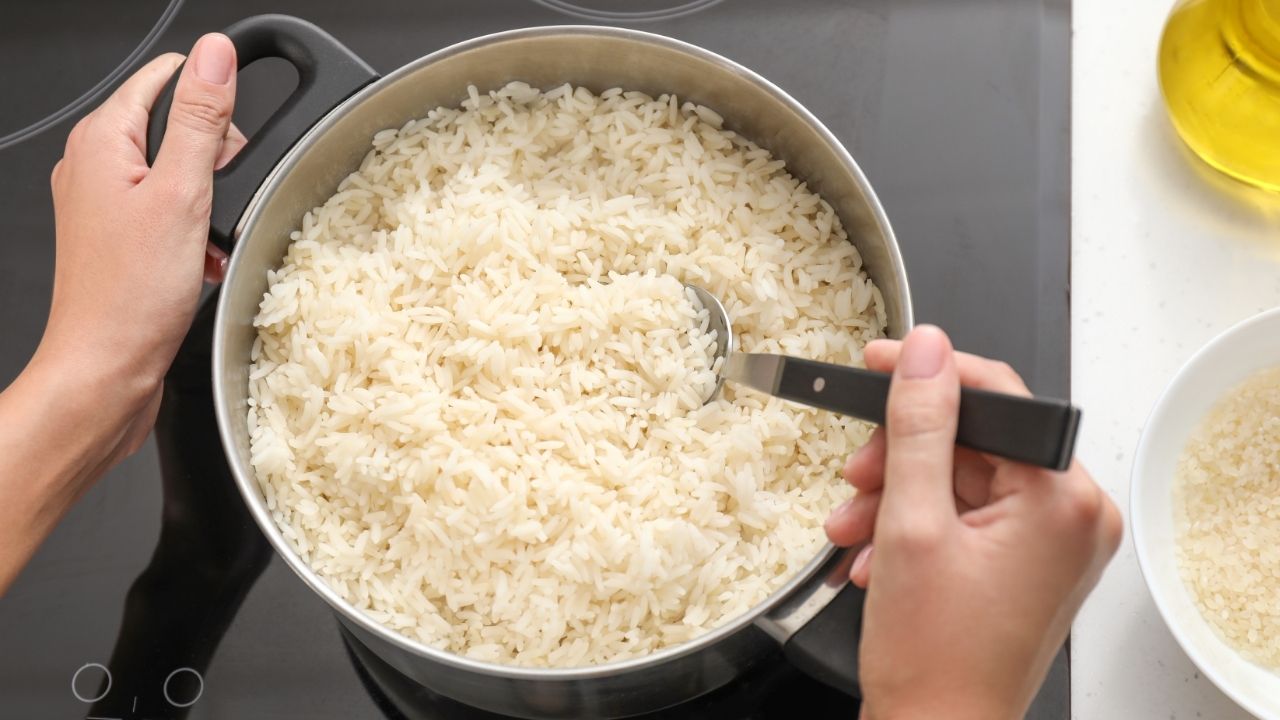
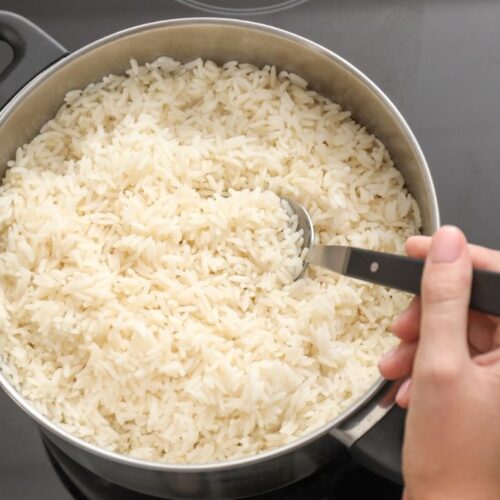
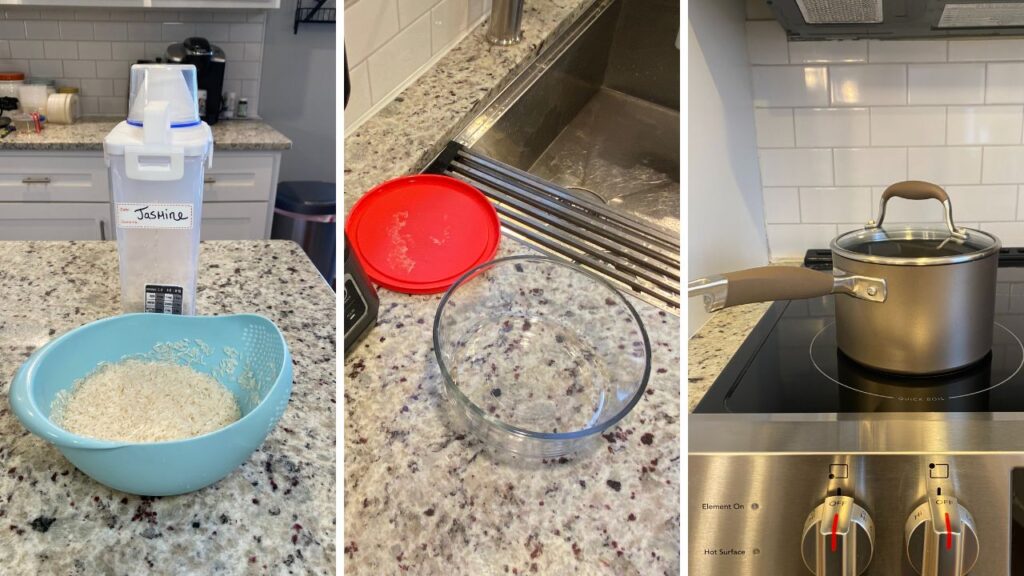
Are you tired of bland, uninspired rice dishes? Say goodbye to boring meals and hello to a world of culinary excitement! Today, we’re diving deep into the art of cooking jasmine rice, and trust us, it’s going to be a game-changer. Buckle up and get ready to elevate your rice game like never before!
Picture this: fluffy, aromatic jasmine rice cooked to perfection on the stovetop. It’s the epitome of comfort food, and with good reason! The stove method brings out the best flavors and textures in your rice, leaving you craving more with every bite.
Pros: The rice turns out irresistibly fluffy, creating a mouthwatering experience that’s hard to beat. Plus, it’s ready in just 15 minutes – talk about a time-saver!
Cons: But wait, there’s a catch! This method demands your full attention. Keep an eye on the pot to prevent any mishaps, and trust us, it’s worth every second!
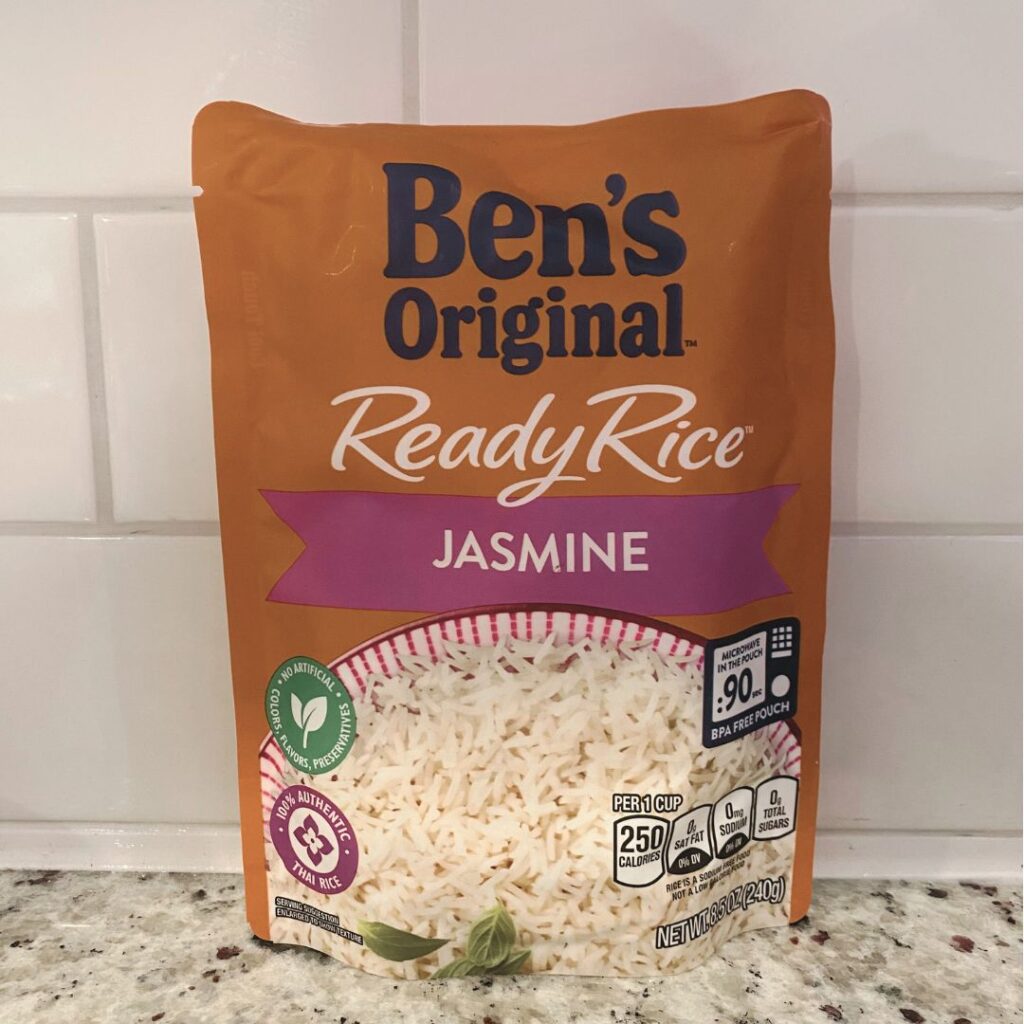
Short on time but craving that perfect bowl of jasmine rice? Enter microwave ready rice – your new best friend in the kitchen! In just 90 seconds, you can enjoy fluffy, flavorful rice without breaking a sweat.
Pros: Convenience is the name of the game here. With microwave ready rice, you’ll have a piping hot meal ready to enjoy in no time. Perfect for those busy weeknights or when hunger strikes!
Cons: But hold your chopsticks! While convenient, this method tends to yield smaller portions and might not deliver the same level of fluffiness as its stovetop counterpart. Still, it’s a small price to pay for the ultimate convenience!
Ready to take your rice game to the next level? Say hello to the Instant Pot – your ticket to hands-off cooking perfection! With just a few simple steps, you can achieve fluffy, flavorful jasmine rice with minimal effort.
Pros:The Instant Pot revolutionizes rice cooking. Set it and forget it – seriously! This method produces fluffy, delicious rice without requiring constant monitoring. It’s a game-changer for busy cooks everywhere!
Cons: But patience is key! Compared to other methods, cooking rice in the Instant Pot takes a bit longer due to the time it takes to build pressure and release it. However, trust us when we say the results are well worth the wait!
Conclusion: Unleash Your Inner Chef!
There you have it, folks – three ways to cook perfect jasmine rice, each with its own unique flair. Whether you prefer the traditional stove method, the convenience of microwave ready rice, or the hands-off approach of the Instant Pot, there’s no wrong choice here!
So, what are you waiting for? It’s time to unleash your inner chef and take your rice game to new heights. Experiment with these methods comment below which one works best for your lifestyle and preferences. Happy cooking!
If you’re in the mood for a comforting meal that’s both vegan and gluten-free, look no further than these Unstuffed Peppers. Packed with flavor and wholesome ingredients, this recipe is sure to become a favorite in your household. Plus, it’s made even easier with the help of an Instant Pot!
Instant Pot:When it comes to meal preparation methods, although I have a personal preference for using the Instant Pot, all recipes shared are suitable for stove-top cooking as well. When I opt for stove-top preparation, I typically utilize a 6.4 cups Dutch oven for soups. Both methods will have printable recipes available below to cater to different preferences.
Pyrex bundle: Before starting the cooking process, it’s recommended to gather and portion out all necessary ingredients, ideally completing some preparatory steps the night before to streamline the process. Using Pyrex containers not only makes storage easier but also doubles as a way to measure ingredients, reducing the need for repeated use of measuring cups. Furthermore, making sure the dishwasher is empty before starting helps speed up the cleanup after cooking.
Vegetable broth: In an effort to optimize cost-effectiveness, I have found purchasing vegetable broth cubes in bulk from online retailers such as Amazon to be a prudent alternative to carton-packaged broth. These cubes can be easily dissolved using an electric kettle and measuring cup set, providing a convenient solution for meal preparation. This equals $0.20 a cup.
16 oz. pint containers: For meal portioning, I suggest using 16 oz plastic pint containers, which provide an appropriate serving size without encouraging overconsumption. These containers, conveniently sold in packs of 50 on Amazon, are dishwasher-safe and freezer-compatible, providing versatile storage options.
These are Amazon Affiliate links that incur no additional cost when clicked.
With its hearty flavors and simple preparation, these Vegan Gluten-Free Unstuffed Peppers are sure to become a staple in your recipe rotation. Whether you’re cooking for yourself or sharing with loved ones, this dish is bound to satisfy.
Peppers
In addition to the tantalizing recipe itself, let’s delve deeper into the culinary wonders behind our Vegan Gluten-Free Unstuffed Peppers. Peppers, often praised for their vibrant colors and crisp textures, are the shining stars of this dish. From the classic green bell peppers to the sweeter varieties like red, orange, and yellow, each adds its own unique flavor profile and visual appeal to the mix. Whether you opt for a single color or a medley of hues, the result is a visually stunning dish that’s as pleasing to the eyes as it is to the palate.
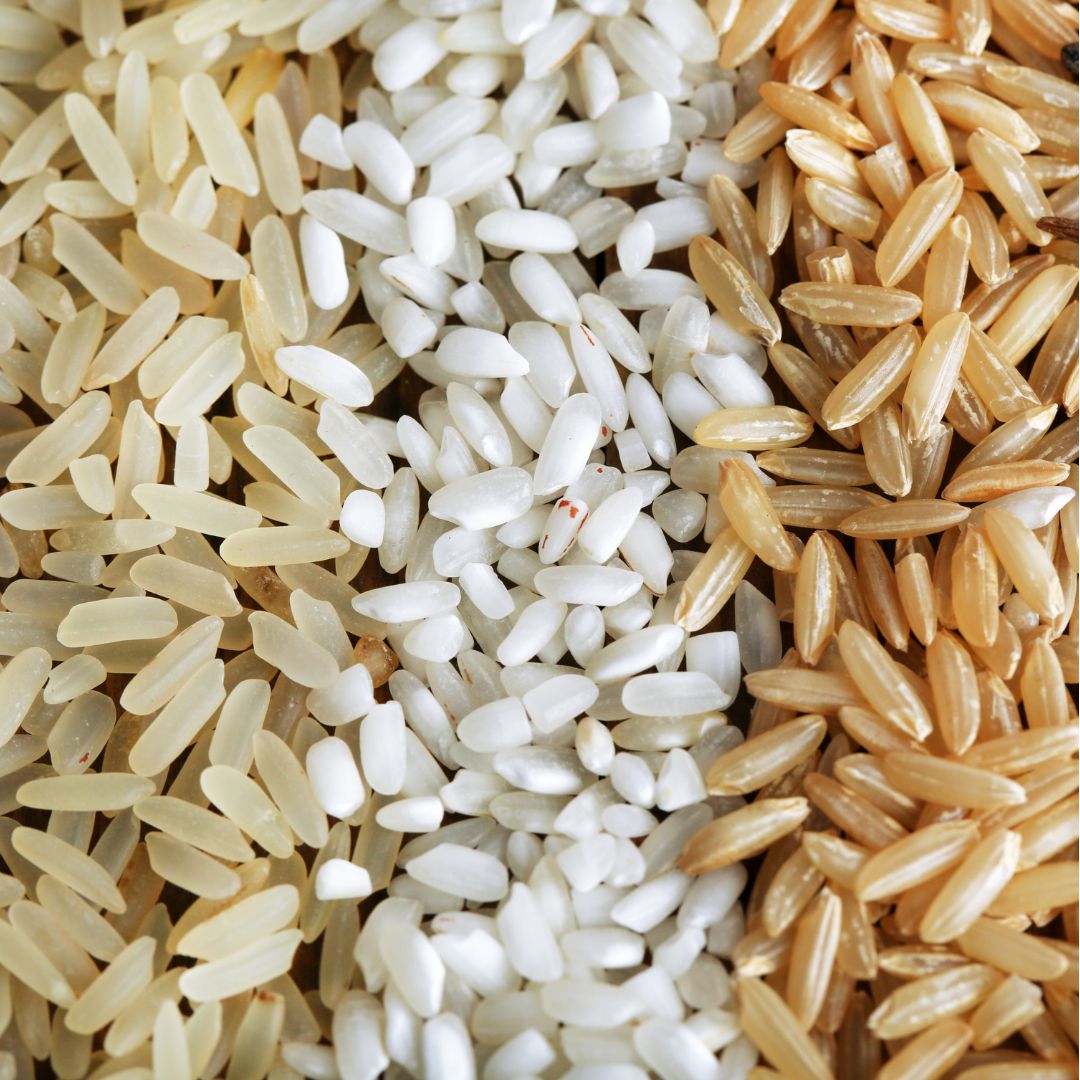
Rice
But let’s not overlook the importance of the rice component in this recipe. While rice might seem like a humble ingredient, its role in the dish is anything but ordinary. By choosing the right type of rice, you can elevate the overall texture and flavor of your Unstuffed Peppers to new heights. White rice offers a light and fluffy consistency, while brown rice brings a nutty depth of flavor and added nutritional benefits. For those looking to experiment further, consider exploring exotic rice varieties such as jasmine, basmati, or even wild rice blends, each imparting its own unique character to the dish.
Impossible Meat
Now, let’s talk about the plant-based protein powerhouse that is Impossible meat. Made from simple, wholesome ingredients and packed with protein, this meat alternative adds a hearty and satisfying element to our Unstuffed Peppers. Not only does it mimic the texture and taste of traditional ground meat, but it also provides a cruelty-free and environmentally sustainable option for those looking to reduce their meat consumption. With Impossible meat, you can enjoy all the savory goodness of meat without compromising on taste or ethics.
Here are two ways to make the stew, either using the Instant Pot or on the stove top.
Vegan Gluten Free Unstuffed Peppers: Instant Pot
If you're in the mood for a comforting meal that's both vegan and gluten-free, look no further than these Unstuffed Peppers.
Prepare Ingredients: Begin by soaking, rinsing, and draining the rice. Then, dice the peppers and onion as instructed.
Saute Vegetables: Switch on the Saute mode on your Instant Pot. Add ½ cup of vegetable broth and cook the diced onions for a few minutes until softened. Next, add the minced garlic and diced peppers, allowing them to cook for an additional two minutes.
Seasoning: Stir in the vegan Worcestershire sauce and black pepper. Once combined, turn off the Saute mode.
Add Ingredients to Instant Pot: Pour in the remaining 2 ½ cups of vegetable broth, along with the tomato sauce, crushed tomatoes, and parboiled rice. Give everything a good stir to ensure all ingredients are well incorporated.
Pressure Cook: Lock the lid of the Instant Pot in place and set the timer to 5 minutes on high pressure.
Prepare Impossible Meat: Meanwhile, on the stove, heat a pan over medium-high heat. Add ¼ cup of water and the Impossible meat, breaking it up into grounds. Cook until browned, then transfer to a bowl and set aside.
Natural Release: Once the Instant Pot timer beeps, allow for a 5-minute natural release before manually releasing any remaining pressure.
Combine Ingredients: After releasing the pressure, stir in the cooked Impossible meat until evenly distributed. Let the mixture cool for 5 minutes before serving.
Serve or Store: Enjoy your Unstuffed Peppers immediately, or portion them out into containers for convenient meals throughout the week.
Keyword Impossible Meat, Peppers, Rice
Vegan Gluten Free Unstuffed Peppers: Stove Top
With its hearty flavors and simple preparation, these Vegan Gluten Free Unstuffed Peppers are sure to become a staple in your recipe rotation.
Prepare Ingredients: Start by soaking, rinsing, and draining the rice. Dice the peppers and onion as directed.
Saute Vegetables: In a large pot or Dutch oven, heat a tablespoon of 1/2 cup vegetable broth over medium heat. Add the diced onions and cook until softened, about 3-4 minutes. Stir in the minced garlic and diced peppers, cooking for an additional 2 minutes.
Seasoning: Add the vegan gluten free Worcestershire sauce and black pepper to the pot, stirring to combine.
Add Ingredients to Pot: Pour in the vegetable broth, tomato sauce, crushed tomatoes, and parboiled rice. Stir well to combine all ingredients evenly.
Simmer: Bring the mixture to a gentle boil, then reduce the heat to low. Cover the pot and let it simmer for about 20-25 minutes, or until the rice is cooked through and the peppers are tender. Stir occasionally to prevent sticking.
Prepare Impossible Meat: While the pepper mixture is simmering, heat a separate skillet over medium-high heat. Add a ¼ cup water and the Impossible meat, breaking it up with a spatula. Cook until browned, then remove from heat and set aside
Combine Ingredients: Once the rice and peppers are fully cooked, stir in the cooked Impossible meat until well incorporated.
Serve: Garnish with your favorite toppings, such as fresh herbs or a sprinkle of vegan cheese, if desired. Serve hot and enjoy your delicious Vegan Gluten-Free Unstuffed Peppers!
Keyword Impossible Meat, Peppers, Rice
With its hearty flavors and simple preparation, these Vegan Gluten Free Unstuffed Peppers are sure to become a staple in your recipe rotation. Whether you’re cooking for yourself or sharing with loved ones, this dish is bound to satisfy you.
In my YouTube video I will show how to cook jasmine rice to perfection! Whether you’re a seasoned chef or a beginner in the kitchen, mastering the art of cooking rice is a valuable skill. In this blog post, we’ll walk you through the a quick step-by-step process of cooking jasmine rice on the stove. Get ready to impress your taste buds and elevate your culinary repertoire!
Benefits of Jasmine Rice
Jasmine rice isn’t just delicious—it’s also packed with health benefits. This fragrant rice variety is naturally gluten-free, making it a great option for those with gluten sensitivities or celiac disease. Additionally, jasmine rice is low in fat and cholesterol, making it a heart-healthy choice. It’s also a good source of complex carbohydrates, providing a steady release of energy to keep you feeling satisfied and energized throughout the day.
Versatility in Cooking
One of the best things about jasmine rice is its versatility in cooking. While this blog post focuses on cooking jasmine rice on the stove, there are countless other ways to enjoy this aromatic grain. You can use jasmine rice as a base for stir-fries, pilafs, rice bowls, and more. It pairs perfectly with a wide range of flavors and ingredients, making it a staple in cuisines around the world.
Incorporating Jasmine Rice into Your Meal Prep Routine
Jasmine rice is also a fantastic option for meal prep. Cook a big batch of rice at the beginning of the week and use it as a base for quick and easy meals throughout the week. Pair it with roasted vegetables, grilled chicken, tofu, or beans for a balanced and nutritious meal. You can also use leftover jasmine rice to make delicious fried rice or rice pudding for a tasty treat.
Jasmine Rice on the Stove Top
I will walk you through the step-by-step process of cooking jasmine rice on the stove.
Congratulations! You’ve successfully cooked jasmine rice on the stove. With this simple yet delicious recipe, you’ll be able to enjoy fluffy and fragrant rice every time. Whether you’re serving it alongside your favorite curry or enjoying it as a simple side dish, there’s nothing quite like a bowl of perfectly cooked jasmine rice. Experiment with flavors and enjoy the culinary journey!