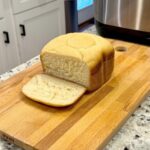
Bread Machine Gluten-Free Vegan Almond Flour Bread
Soft, sliceable, and perfect for toasting. A weekend staple in our home!
Equipment
- 1 Bread machine with gluten-free setting
Ingredients
Liquids
- 1 1/4 cup water room temperature (300 ml or 300 grams)
- 2 1/2 tbsp. olive oil
- 2 tbsp. maple syrup room temperature
Dry Ingredients
- 199 grams potato starch 1 3/8 cups
- 181 grams almond flour 1 1/2 cups
- 1 tsp. salt
- 1 3/4 tsp. xanthan gum 5.3 grams
- 1 tsp. instant active yeast 3 grams
Instructions
- Prep Like a ProMeasure the maple syrup and water first, and allow them to come to room temperature. Cold ingredients can mess with the rise.For best results, weigh your flours and starch using a digital kitchen scale. Trust me, it makes a huge difference in gluten-free baking!
- Secure the PaddleDouble-check that the paddle is locked in place at the bottom of your bread maker’s pan. You don’t want to forget that step.
- Layer the Ingredients – In Order!First, the liquids: water, maple syrup, and olive oil.Next, the dry ingredients: potato starch, almond flour, salt, and xanthan gum.Last but not least: sprinkle the yeast right in the center, on top of the flour. Avoid letting it touch the liquid—this helps control the rise time.
- Set It and Forget It (Almost)Select the gluten-free setting on your bread machine. Be sure to set it to a 1.5 lb loaf. I also like to choose the dark crust option for a little extra texture. Hit start and let your machine do the work: mix, rise, and bake!Tip: After the first mix, use a spatula and push down any excess up to high; this will allow the loaf to bake uniformly.
- Cool and ServeWhen the cycle is complete, let the bread sit in the pan with the lid open for a few minutes. Carefully remove the pan using oven mitts—it's hot! Flip the pan and gently shake the loaf out. Use the metal hook (if provided) to remove the paddle from the bottom. Let the loaf cool completely on a wire rack before slicing or storing.
Notes
Store your cooled loaf in an airtight container at room temperature for up to 3 days.
After day 3, it starts to get a little dense—perfect time to cube it up for homemade croutons or toast!
Want a tighter crumb for sandwiches? Let the loaf cool completely before slicing, and use a serrated knife for clean, even cuts.